Sixgun Flu
Fine-tuning the double-action revolver
Getting the best performance from a high-quality revolver may require some fine tuning.
Most box-stock autoloaders will work pretty well right out of the box fired with the ball ammo most were designed to shoot. Where most go off the rails is with ammo they don’t like. Fed properly, and absent undue wear or abuse, they will soldier on forever. Double-action revolvers, on the other hand, will function with virtually anything that 1) has a live, properly seated primer, 2) fits in the chamber and 3) doesn’t seize in the chamber or blow the gun up on the first shot. But double-action revolvers, especially big bores, seem more prone to get out of kilter through ordinary use and may, occasionally, require some minor adjustments to remain healthy and happy.
While these remarks are generally applicable to all DA revolvers, they are specifically tailored to the ubiquitous Smith & Wesson guns. There are three major problems that crop up. Typically, the symptoms are the same: the gun develops a ‘gallop’ or cramp in the action cycle that can vary from chamber-to-chamber. In combination, a couple of the problems can bring the cycle to a halt.
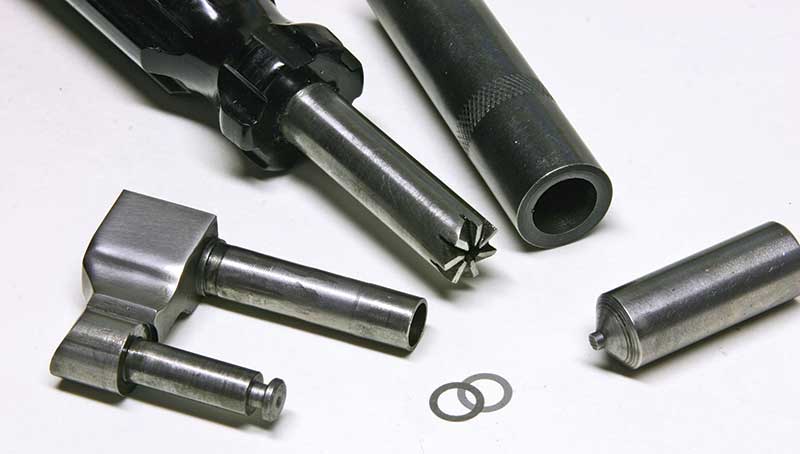
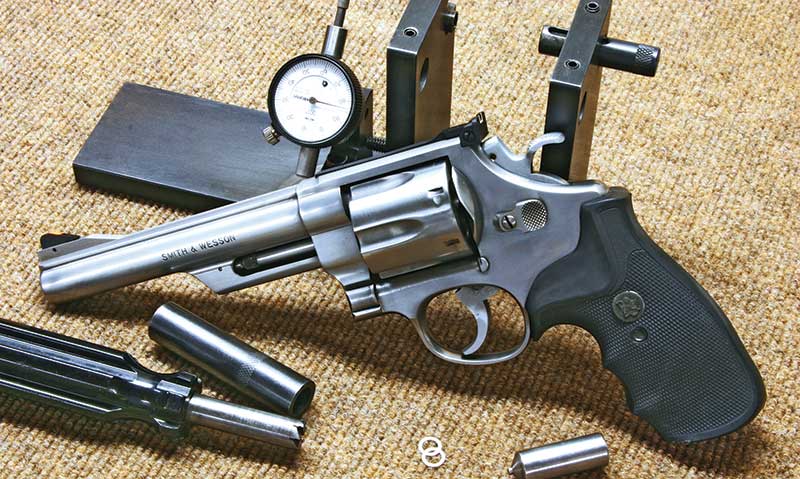
Sorting out yoke fit requires a spot-facing cutter with its guide sleeve and a yoke alignment tool.
The shims take up any slack. Yoke alignment is checked with this
special gauge pin. The tip of the tool must enter the receiver center
pinhole without hitching or binding.
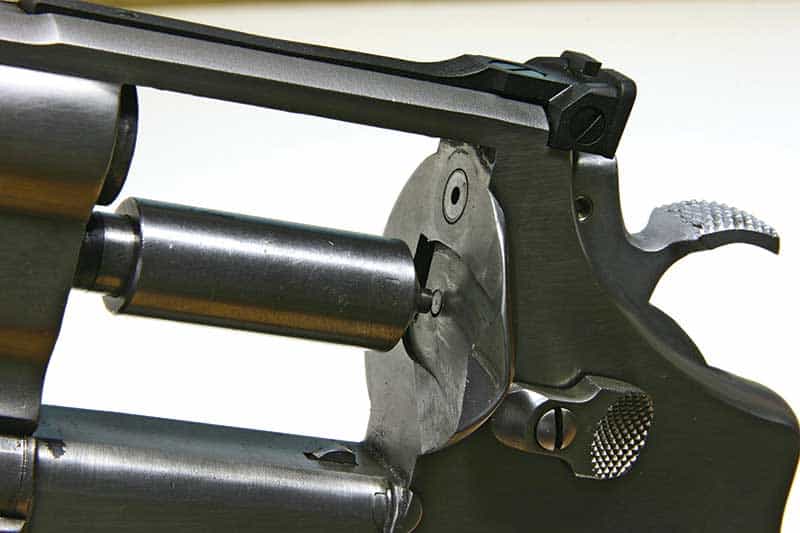
Happily, the condition most responsible is the least troublesome to set aright. It is cylinder endfloat, defined as the back and forth movement of the cylinder on the “yoke” in S&W parlance (“crane” in others) along its center axis. In the extreme cases causing action binding, you can almost always hear a click when you move the cylinder back and forth. If you look across the barrel-to-cylinder gap, you can see it tighten and loosen when the action is cycled. If the hand tips the cylinder forward enough to drag on the barrel extension, you will often feel a noticeable increase in cycling pressure. It is not unheard of for the gun to simply stop running mid trigger stroke.
The basic cause is usually just using the gun. The basic S&W design is over a 100 years old and did not contemplate magnum cartridges. The small yoke-to-cylinder bearing area simply batters in time and the increased clearance allows longitudinal cylinder movement. The basic fix it to take up the slack. This is done variously through yoke-stretching procedures or shims. I find the Power Custom shims more predictable. Using as many of the .002″ shims as is necessary, I’ll put them in the bottom of the cylinder yoke bore where the yoke bears and try the cylinder. When it closes stiffly, I know we’re there. I use a Brownells/Power Custom yoke-squaring tool to remove just enough material to let the cylinder run free with no back-and-forth movement. A side benefit is an increased bearing surface once trued up. This should not materially change the headspace but you must check it to be sure. Feeler gauges will do for an open-back cylinder. A recessed head cylinder will require both feeler gauges and depth micrometer. The barrel-to-cylinder gap may show a small increase but usually it remains in spec.

The yoke alignment is actually set with the adjustment bar.

Straightening the ejector rod requires a dedicated fixture for best results.
The actual adjustments are made with the same tool as the yoke adjustments.
The next adjustment that may be necessary to cure a galloping action is yoke alignment. The cylinder center pin runs in a corresponding hole in the standing breech. If the yoke isn’t in exact alignment with this hole, the center pin will bear on just one side of pinhole and can cause dragging or binding problems, especially if the extractor isn’t well centered in the cylinder.
Adjustment is pretty simple and requires a simple yoke alignment gauge and an adjusting tool. With the gun held firmly in a padded vise and the cylinder removed, just install the stripped yoke and yoke side-plate screw, making sure the yoke opens and closes freely. With the alignment tool on the yoke, hold the yoke closed at the front and run the alignment tool nose into the center pinhole in the frame. If the tool won’t go or rubs on an edge, open the yoke, remove the tool and, with the yoke held in the open position by hand, adjust the alignment with a proper adjusting bar by bending the yoke ever so slightly in the required direction. The alignment tool should run freely in and out of the center pinhole.
For reasons known only to the cylinder gods, S&W ejector rods always seem bent or getting ready to be bent. Once tweaked out of alignment, they are another major cause of the dreaded action gallop. Opening the cylinder and spinning it, any serious misalignment in the rod will be evident. With the yoke removed, you will often see a spot of blue wear on a portion of the rod where it runs out and rubs on the yoke. The bigger problem is out at the end of the rod where it engages the front locking bolt under the barrel. This eccentric movement is felt in the action cycle as varying pressure to run the gun from chamber to chamber.
Adjusting the ejector rod alignment is the trickiest part of this exercise and requires dedicated tooling to do it at all well and predictably. The excellent Power Custom ejector alignment fixture isn’t cheap but it works better than anything else we’ve ever tried. The tool consists of a cradle which holds the cylinder assembly and lets you spin it with a dial indicator bearing on the tip of the ejector rod. Again, the adjustment tool is a round bar with a hole in it to accept the rod. Once you determine the direction of the misalignment, you tweak the rod the other way. Sounds easy enough in theory but, in practice, it can be a bit exasperating and can take a few minutes of fussing around to perfect. We figure anything less than .005″ or so is about as good as it gets.
This general malady is fairly common and is regular fare for revolver doctors. The condition rarely disables a good revolver but leaves it in a miserable, sickly state. Unlike a lot of basic gunsmithing, unless you have the tools, there may be no substitute for seeking professional help. Still, just recognizing the symptoms will give revolver shooters a fighting chance of curing revolver flu.
Grand Masters LLC
(Formerly Power Custom)
29379 Hwy. J, Gravois Mills, MO 65037
(573) 372-5684
Brownells
200 S. Front St., Montezuma, IA 50171
(800) 741-0015