For a while now, I’ve been using some Real Avid brand specialty AR tools that I now consider indispensable for any AR build project. The first is their LUG LOK Upper Vise Block for barrel installation and removal. This tool engages the bolt lugs in the barrel extension and prevents torque from being transferred to the sides of the upper receiver. This tool retails around $60. The second is their Smart Fit AR15 Vise Block, which can be tightened in the magazine well to hold any lower still while you work. MSRP is about $30. The final item is less than ten bucks but worth far more than that in hassle. Their AR-15 pivot pin tool makes that job a snap.
The other tools you’ll need you may already own: a vise mounted heavily enough to hold steady under torque up to 80 lbs. for mounting the barrel and holding the magazine well vise block, forceps to hold you pins while you tap them in place, large high quality Vise-Grip pliers with their jaw tips shielded with tape, roll pin punches and small hammer, an armorer’s block or a piece of wood to support the rifle when you install pins, a ½” drive torque wrench, a barrel nut wrench, a large blade flat screwdriver to attach the buttstock, some graphite free grease to keep the barrel nut and receiver threads from galling (Aeroshell 66 is recommended), and a roll of thick duct tape to protect the receiver when you are installing pins. Finally, get a headspace GO and NO-GO gauge too. I got mine from Brownells for $66. AR parts are so precisely made these days, I know some folks who think nothing of putting a rifle together and using only a live round as a headspace gauge. Don’t do that. It’s unwise at best and unsafe at worst.
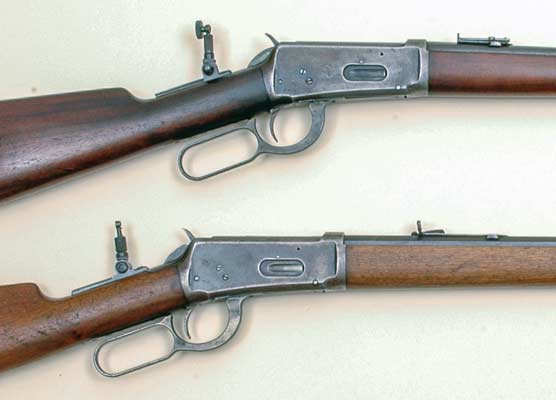
Home Build A Retro AR
A home-built AR, with the help of Brownells,
takes the best of the M16A1 and makes it even better.
Frank decided to work with some great Brownells parts to build a
retro-style M16A1, but with modernized internals for performance.
Get all of your gunsmithing tools at Brownells.com by clicking here.![]()
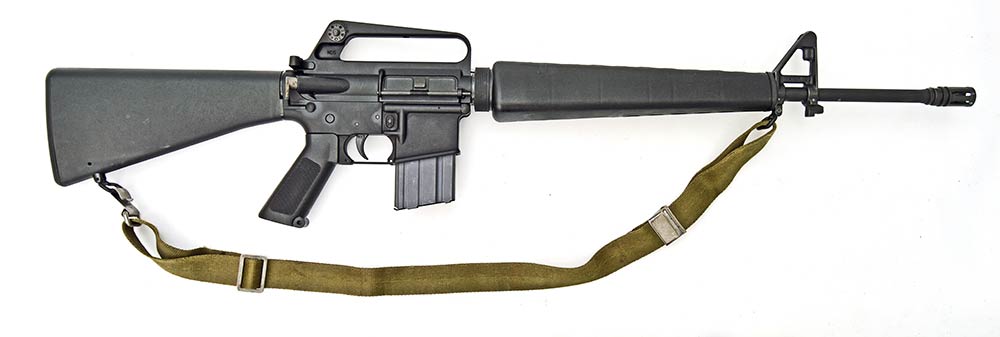
How about we build a semi-auto, old school, dual aperture flip sight, pencil barrel, carry handle, Vietnam issue M16A1 look-alike that’s discretely adapted and updated to shoot better than the original guns for a great price? It’s easier now than it has ever been thanks to the Brownells Retro parts line.
A wave of military AR nostalgia has swept over the country. Brownells introduced their Retro line of AR-pattern rifles built with newly manufactured components. Before the Brownell’s Retro guns, the only other the only ways to get a classic M16 style rifle was to buy one of the 2,500 limited edition Colt reissued M16A1 semi-autos at the twice the price of the Brownells or search the gunshows for vintage parts and build up your own. Brownells just made building your own a lot more practical.
The new Brownells Retro rifles and parts are of excellent quality and authentically reproduced overall. However, they are not intended to be exact copies in every tiny marking and detail. Expect a little difference in the texture of the magazine release button, and the color of the gray anodizing and the material the stocks are made from.
The Brownells rifles are great, but my ideal M16A1 would be a little different, and getting exactly what you want is the whole point of building your own. The original M16A1, and the Brownells 5.56mm Retro models, are fitted with 1:12 twist barrels intended for the light 55-gr. M193 ball ammo introduced with the rifle in the early 1960’s. I wanted a twist better suited to the heavier bullets used common in today’s factory loads and surplus military 62-gr. M855 ball and NATO equivalents.
I also want a better trigger. The M16 has never been praised for its crisp, light, trigger pull. The rifle was then and remains very lubrication sensitive compared to other guns and its direct impingements gas operating system steadily dumps hot gas and carbon into the action to dry and gum it up. I want a bolt carrier group that leverages the advances made in lubricous protective coatings in recent years to increase reliability and reduce cleaning effort on my part.
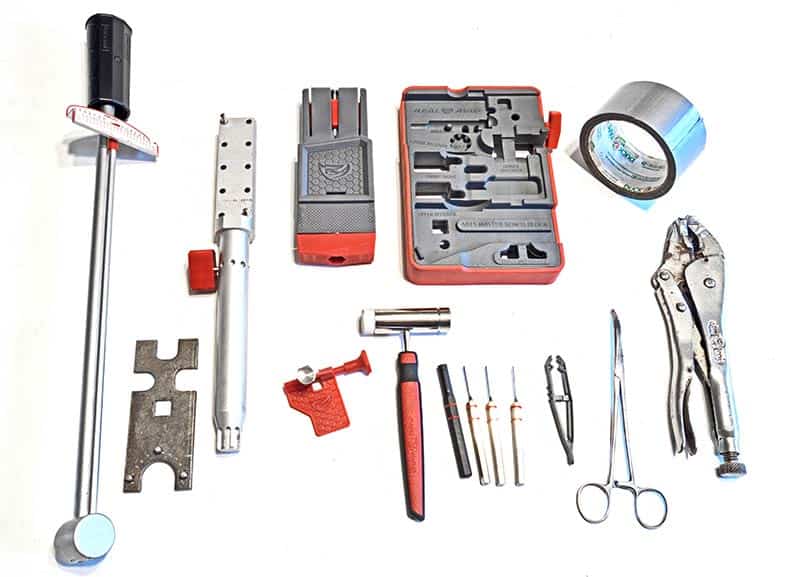
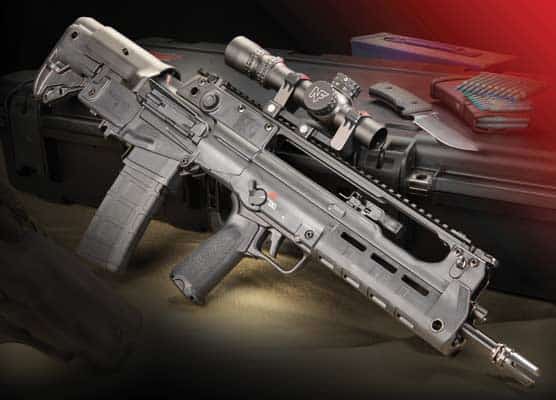
The tools of the trade for Frank and this project gun.
A Solid Beginning
Brownells was the source for all the retro M16A1 parts for my project. The upper A1 upper receiver has a forward assist and no shell deflector. The lowers have less metal reinforcing their pivot pin hole in the front and the mounting threads for the buffer tube in the rear. These are made from forging but obviously aren’t as strong as the beefed-up modern receivers. There’s a reason the military retired the A1 receiver, but outside of actual combat, or utterly ham-handed manipulation at the hands of a disinterested draftee, I expect they will hold up fine. I know my 35-year-old Colt SP-1 has. Though the Vietnam-era guns were really grey, I chose black anodized upper and lower receivers ($150 each) because black is easy to match.
I chose a complete pencil barrel assembly, 20″ chrome-lined, 1:7 twist, with the front sight base, nylon coated sling swivel and round front sight post, triangular handguard cap, straight delta ring, barrel nut and weld spring ready to mount for $242.99.
While the M16A1 had a black parkerized bolt carrier group, I wanted a nitride-coated one for better corrosion and wear characteristics. It cost only $89.99. I am always leery of bolt carrier groups of unknown manufacture which is why I like that Brownells doesn’t keep this information a secret. Theirs is made of 9310 steel, shot peened and heat treated, with O-ring upgrade on the extractor, staked gas key screws and magnetic particle inspected.
The original the M16’s distinctive triangular shaped foregrip is a natural fit to the hand and one of the best aspects of the rifle. I compared the Retro stocks to the original and found they recreated the geometry faithfully, including the early rubber buttpad. The only noticeable difference is the aluminum heat shield, hidden when assembled, and a slightly more evenly matte finish. The entire three-piece stock set costs only $79.99.
The new Brownells 20-round magazines differs from the GI issue in three small ways: their name is on the side, the follower is plastic instead of an aluminum, and they have a more matte grey finish. They appear well made, functioned fine with the usual 18 rounds loaded and cost only $20. Their AR-15/M16A1 Rifle Buffer Tube Assembly ($54.99) turned out to be made by LUTH-AR. It included tube, spring, buffer and buttstock screw.
A gun is only as accurate as its trigger pull allows it to be, so I decided to go with the best. I am considering using this rifle in a Camp Perry Service Rifle competition for the fun of showing it off to its grandchildren. With this in mind, the only choice was a Giessele Automatics Hi-Speed National Match. This is a $240 trigger at full retail, and worth every cent. You won’t find one better. Competitive shooters made their mind up about that long ago. The Geissele Hi-Speed National Match is a two-stage trigger that is adjustable for first- and second-stage pull weight and over travel, allowing the competitor to tune it to his tastes and competition type. It comes with three sets of springs. The Service Rifle gives you a range anywhere you want from 4.5 to 6.5 pounds. (That’s a combination of first and second stage.) CMP Service Rifle competition requires a minimum trigger pull of 4.5 lbs. The next set of springs gives you a range from 3.0 to 5.1 lbs. (This is the set I used because I don’t see myself dialing my trigger pull down to bench rest competition levels.) The final set of springs gives a range of 1.9 to 3.4 lbs.
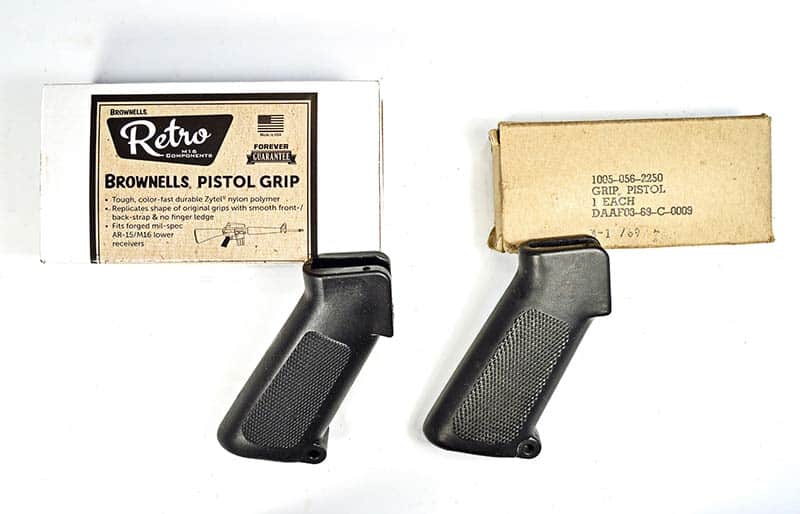
The Brownells retro pistol grip on the left is a capable reproduction of the original. A 1969-era grip is shown at right.

Frank says the Real Avid Pivot Pin installer tool is the best $9 he ever spent.
Diving In
Setting up the trigger was the most time-consuming aspect of this build. The first step is to check trigger clearance in the frame and around the safety. The Retro lower had no issues with the trigger hole, inletting or safety. The next step is to install the trigger and spring without the hammer and adjust your first stage pull weight. It requires a trigger pull gauge. I use a Timney that I got from Brownells for $32 but any that measures down to half a pound will do the job. The trigger spring is adjusted by gently bending it with pliers just before the coil — toward the coil to increase and away to reduce first stage pull. It’s a matter of experimenting and unless you like the initial pull weight when your first install it, you are going to have to take it out and tinker with the spring at least once. I used the mil-spec pins from my lower parts kit and saved the nice tight Geiselle ones until I had that first stage adjusted.
Once you have the first stage pull weight set, the rest is painless. The hammer is installed and the three socket head screws in the trigger itself are adjusted with the Allen keys provided for proper sear engagement, final trigger pull and overtravel. If you are patient and follow the instructions in the illustrated manual, you’ll have a fine trigger as well as a better understanding of its function. By the way, these triggers have a lifetime transferrable warranty on them.
Had Brownells not been backordered on some of the small parts I needed, I probably could have done this rifle with one-stop shopping. Fortunately, LUTH-AR made an early A1 style two position flip rear sight for Brownells and they had stock on hand. They also make the classic “T” charging handle, ejection port cover, gas tube, trigger guard, and a special AR Builders Lower Parts Kit that omits the pistol grip, hammer and trigger and is priced accordingly at $36.99. It was perfect for this project because I already had a specific pistol grip and trigger in mind, as many do when they build their own gun. All the small parts totaled $124.73 and what LUTH-AR didn’t have, I got from Sherluk Defense, who specializes in vintage and current American military firearms parts and accessories.
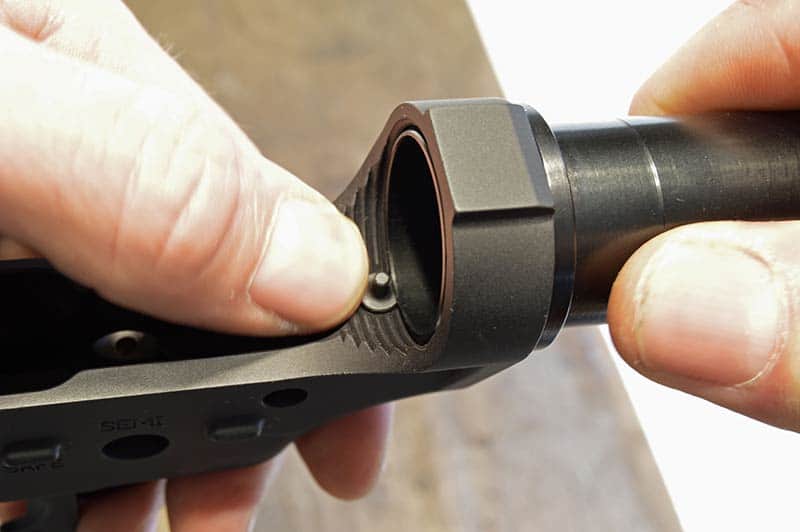
Frank says, “remember to put the buffer retainer in before you torque on the extension or you will be doing it twice.”

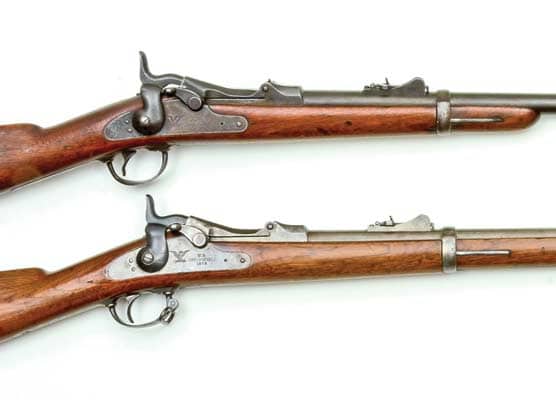
The simple and trim carry handle area and rear sight assembly of the A1 is really retro and attractive.
Barreling Through
The most intimidating aspect of your first AR build is generally the barrel installation on the upper followed by the buffer tube installation on the lower. Once you’ve done that, having a nice result is just a matter of being careful while installing parts so you don’t scratch or bang up your gun while driving in various pins.
A retro build is the same as any AR build with the exception that there is no specific position for clocking the early birdcage flash hider, which stays put by virtue of an old-fashioned split lock washer. Also, you need an open barrel nut wrench to clear the triangular front sight base. Of all the open style tools, the original G.I. issue one with the hardened steel pins is the best and easiest to use.
Installation procedure for a rifle buffer tube differs from the carbines folks commonly build. You can only apply torque from the very end and usually the slot on your wrench won’t fit tight enough to do the job without slipping off and rounding the corners. The solution is to use an ordinary 8″ adjustable wrench and hold it snuggly against the flats with a bolt and washer. This has never failed me. I recommend you secure the lower upright in a padded vise and clamp it just behind the trigger guard hole where the metal is thickest. Turn the short wrench handle as tight as you can while supporting the top end of the buffer tube with your other hand and you’ll meet the torque specification.
The mark of an amateur builder comes in the form of the hammer marks and scratches they put on the gun while installing the AR’s many pins. Even if you are a clumsy brute, you can avoid this by taping up the receiver with a few layers of thick duct tape to protect it from your wayward blows. Another tip is to use the special punches for driving roll pins. They have a nipple in the middle of the tip that keeps them centered on the pin better. Alternatively, many small pins can be pressed in with the padded japs of vise grips. Adjust the pliers first so they don’t squeeze too much and damage the receiver. I used a little sheet brass cut from cartridge cases as covers for the serrated front jaws and secured them with tape. Whether you drive or press the roll pins in, the starting procedure is the same. Grease the pin, position its end in the hole with a pair of medical forceps and give it a few light taps to seat it in.
This rifle went together without the smallest hitch which is a characteristic of a build using quality parts. When I did the math. I made a gorgeous replica of the M16A1 with the finest match trigger in the world for around $1,100 in parts. Merry Christmas to me!
CONTACT:
Brownells:
http://www.brownells.com/
(800) 741-0015
LUTH-AR:
http://www.luth-ar.com/
(763) 263-0166
Sherluk:
http://www/sherluk.com/
(419) 923-8011