Ham'r Time!
Make Your Own DIY AR-15 Rifle

I’m not a gunsmith, nor do I play one on TV. Unlike former Editor Roy, I don’t have a fully equipped machine shop capable of manufacturing all the requisite parts for a B-2 bomber. I do tinker with basic assembly-type operations and minor stuff like swapping sights, installing trigger upgrades and other such novice-to-intermediate level projects. So, this project was a bit of a stretch for me — could I machine a hunk of aluminum “good enough” to not only function but perform at a level worthy of range respect?
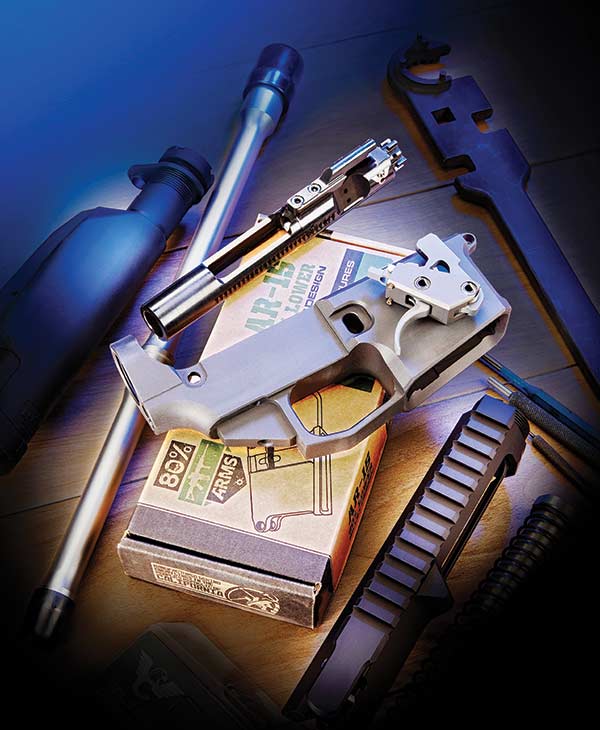
Fortunately, the 80 Percent Arms folks have worked with plenty of novice gun builders over the years, so they’ve figured out how to make the process dummy-proof, provided you follow the instructions with care. When ordering an 80 percent AR10, A15 or AR9 receiver, you’ll need two things: the partially machined lower receiver itself and the jig kit facilitating proper milling and drilling. The receiver is not legally a firearm — yet — because it’s completely non-functional until you remove lots of metal in the trigger group area and drill a few holes. As such, you can order this kit to be shipped straight to your home — for now, anyway. Do note the product and process provides no exceptions to existing gun laws. If you’re not eligible to possess a firearm, you can’t legally buy this one either.
Jig Magic
The jig itself is … brilliant. After assembling the side supports and top plate, you mount the receiver blank using the pivot pinhole and a buffer tube attachment point. The top plate serves as a guide to control virtually any standard router — your milling tool. The side plates not only mark locations of the receiver holes you’ll create with a hand drill or tabletop press, they also serve as guides ensuring your holes are perfectly perpendicular.
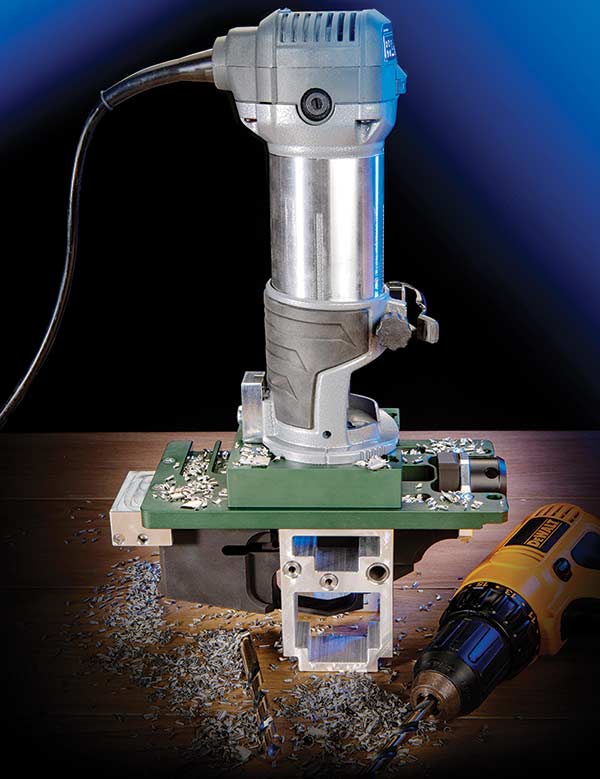
The company provides a custom router plate mating with the top plate of the jig setup. This router plate accepts mounting pegs interfacing with recessed templates in the jig top plate. The pegs and guides limit router movement so you’re only cutting between the lines with the company’s router-compatible milling bit.
The process is simple. Using a handy built-in milling bit depth-setting guide, adjust your cutting depth to the shallowest mark. With each pass, you shave off a layer of aluminum by swirling the router in a spiral pattern until you’ve cleared the area bounded by the jig template. I didn’t measure, but each pass cuts maybe 1/16th” or so. Then adjust cutting depth to the next level indicated by the guide and repeat the process. Be patient and don’t try to cut deeper else you’ll create chips in your future receiver.
You’ll make 20-some passes, changing router plate pegs twice more in the process. The deeper pegs limit you to different portions of the cutting template on the jig’s top plate. By the time you’re done, you’ll have cleared out the entire trigger group area clear through to the trigger hole itself. I was amazed at the precision of the millwork, considering I was using standard household tools. The result was smooth and precise, and all parts fit perfectly when complete.
After you’ve milled out the receiver, you’ll need to drill three holes for the trigger and hammer pins and the safety itself. By rotating the jig in your vise, you’ll have easy access to the jig guides. I used a cordless hand drill with no ill effects.
I did have to make one small adjustment. The safety detent hole needed a bit of cleaning out where it intersected my freshly drilled safety lever hole. A quick pass with the correct-sized drill bit fixed it in seconds.
Assembly
The assembly process is completely standard as the completed lower offers full compatibility with standard mil-spec off-the-shelf AR rifle parts.
For assembly help, visit Brownells.com and check out their AR video series. It’s excellent and easy to follow. I will point out one minor difference. The bolt release doesn’t use a standard roll pin. The pinhole in this build is blind with the 80 Percent Arms design, so they include a threaded pin that screws right in. Just be sure to look for it in the package and you’re good to go.
HAM’R Time
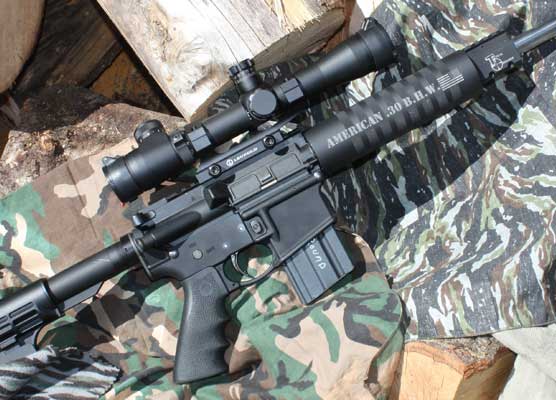
His Editorship Brent T. Wheat envisioned this project as McHale’s Monster, so the caliber had to be worthy of the name. That’s a lot of pressure to put on an editor for a “competing” magazine. Oh, by the way, feel free to check out American Handgunner anytime! I felt it appropriate to contact the folks at Wilson Combat for perspective. “A monster you say? You have to build this rifle in .300 HAM’R.” Sounded legit to me. Deal.
The .300 HAM’R is a brainchild of Bill Wilson. An avid hunter not quite satisfied with the terminal performance of either the .300 Blackout or 6.8 SPC, he set about creating a full-blown .30 caliber living in peace and harmony in a compact, light AR-15 platform. In fact, the .300 HAM’R requires nothing more than a barrel swap from standard AR-15 fare. Even the bolt remains the same, although Wilson recommends using a magazine friendly to 300 Blackout cartridges for best feeding. I used a Lancer during testing, and it was peachy. Feeding was flawless.
While you can get brass from Starline, you can also re-size and cut down good ’ol .223 once-fired to make cases — a nifty benefit of sticking to a .223-compatible platform. As for terminal performance, think of something along the lines of a turbo-charged .300 Blackout. Without having to fit those extra-long subsonic projectiles, the case is just over a quarter inch longer, creating more case capacity and top end velocity. The .300 HAM’R shines with .308 bullets in the 95- to 150-grain range. And yes, you can get reloading dies to roll your own at home. Given the infinite availability of brass, and in normal times, projectiles, I see no downside to using this niche cartridge provided you reload. You’ll be rewarded with about 400 extra foot-pounds at the muzzle over 300 Blackout and a couple hundred more than 7.62×39.
Wilson Combat Up Top
Given the caliber choice for this pig-slaying DIY rifle, the choice of upper receiver and barrel components was easy — Wilson Combat. On Bill’s recommendation, I opted to go with the 16.2″ Ranger Match-Grade barrel with a 1:15″ twist rate. The setup calls for a mid-length gas system, offering a bit of chilling out of the operation of the system. Capping the barrel is the Wilson Combat Q-Comp. This rifle doesn’t have near the boom factor of an AR10 .308, but the brake is handy for keeping the muzzle on target during rapid fire.
Holding it all together is a Wilson Combat billet upper receiver. There’s no forward assist, nor is one needed for this rifle, saving a bit of weight and keeping a nice clean profile. The handguard is a Wilson Combat 12.6″ M-LOK system. It’s a perfect fit, leaving about 3-1/2″ of muzzle (not counting the brake) exposed. The continuous top rail offers plenty of real estate for a backup sighting option — hold that thought. Seven surrounding surfaces offer M-LOK mounting points along the entire length of the handguard, so attach lights, lasers, or bayonets wherever you please.
The go-bang system is a Wilson Tactical Trigger unit. It’s a two-stage design offering about 1/8″ of smooth and grit-free take-up, followed by a 16th of an inch of constant pressure travel before a glass rod break. I measured the pull weight at 4-1/2 lbs. The trigger is marvelous and I found it easy to stage for precise shooting.

Sighting In: EOTech Vudu
A 125-grain HAM’R bullet (Sierra SPT for this example) will carry 1,000 ft-lbs of energy out to just past 200 yards and remain supersonic until it travels about 570, so I wanted to use a lower-power variable magnification sighting option. Given its suitability for closer range moving targets, like feral pigs, I also wanted to maintain a wide field of view and fast sighting option. The EOTech Vudu 1-6×24 FFP fit the bill.
This Vudu features the fast 70-mil “outer ring” surrounding the crosshairs. Centered in the circle is a standard cross reticle with a thick center aiming dot. At 1x magnification this serves as a giant hollow red dot sighting system. It’s fast — super fast. The five hashmarks in each direction from the center give you quick hold points for elevation and wind adjustment. In lower light conditions, you’ll see the whole shebang, outer circle, and inner reticle, light up in red, so don’t worry about those daybreak and dusk outings.
The left “turret” is a battery cap. Between the cap and scope body, you’ll find rubber-coated push buttons on the top, front and rear sides of the battery housing. The top button powers the illuminated reticle while the front and back buttons decrease and increase brightness. You won’t see much illumination in bright daylight conditions, but that’s okay as it’s designed for low-light use.
This Vudu is a first focal plane scope, so as you rotate the rear of the scope body to change magnification, you’ll see the entire reticle grow and shrink. The real benefit to the first focal plane design is the holdovers represent the same adjustment regardless of what power lever you choose. If you want to adjust windage and elevation on a shot-by-shot basis, the two reticles are exposed for quick and easy adjustment in 0.2 milliradian increments.

Back Up: XS Offset Sights
Given this rifle’s sweet spot of up close and personal and out to a few hundred yards, we decided to equip it with a secondary sighting system. While the EOTech Vudu adjusts down to a handy 1x, moving from fully magnified to a short-range configuration takes a few seconds.
Enter the XS XTI DXS Ember Offset Iron Sights. Intended for mounting forward of an optic (rear sight too), these mount on the top rail at a 45-degree angle right of left of center. When you want to use the sights, just rotate the rifle counterclockwise (if you’re right-handed) without breaking your shoulder mount and the irons are lined up and ready to go. Be sure to use scope rings tall enough so as not to obstruct the iron sights.
The front sight uses a bright orange photoluminescent dot, highly visible in daylight and transitional light conditions. The rear is the standard XS V-notch with a white vertical bar to aid centering. It’s drift adjustable to reconcile windage point of impact.
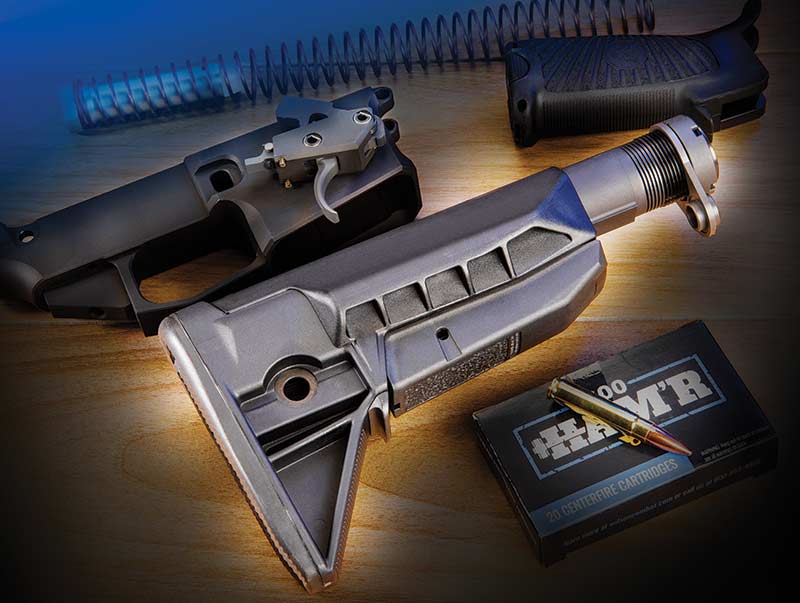
Stock
The buttstock choice was easy. Bravo Manufacturing’s BCM Gunfighter Mod-0 SOPMOD. This adjustable design offers generously wide cheek weld surface that aids consistent shooting and recoil management. The rubber buttpad keeps your rifle anchored and multiple sling attachment points offer carry flexibility. The nifty hidden feature is a sling management tab for a bungee or rubber band to keep your sling tucked in close while not in use.
Ballistic Games
With manufactured rifle in tow, I headed off to the range to see how this garage masterpiece performed. On this first outing, I tested three types of custom ammunition manufactured by Wilson Combat: 125-grain Hornady FMJ, 125-grain Sierra SBT Pro Hunter and 110-grain Speer SP.
With its extra case capacity, the HAM’R generated average muzzle velocities of 2,488 (FMJ), 2,544 (Sierra SBT) and 2,615 fps (Speer SP). At 100 yards, five-shot group sizes averaged 1.76″ (FMJ), 1.92″ (SBT) and 2.76″ (Speer SP). I did have a bit of a shake between lower and upper receivers and eliminating movement will likely shrink the groups a bit more. The Vudu scope also uses a thick aiming dot and reticle owing to its 3-Gun and Tactical design goals, so I didn’t have absolute aiming precision at 100 yards. Still, not bad at all for a “firearm” (lower receiver) built in my garage with a router!
Regardless of what our political overlords decide to do with the whole notion of home-built 80 percent rifle receivers, I found the building and assembly process immensely satisfying. With care and patience, you can do a fine job of building your very own rifle. Picking every component from the ground up is icing on the cake.