Sight Crankin' You Can Do This At Home
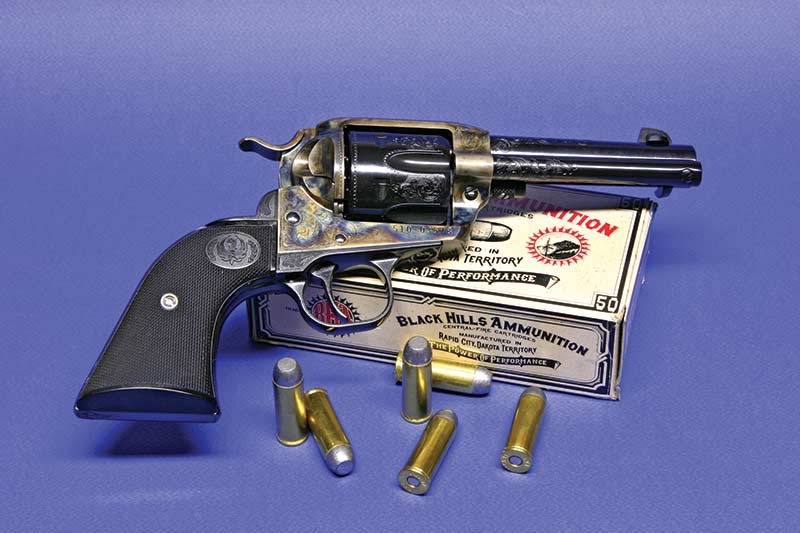
My Lightweight, engraved Ruger Vaquero is still only as good as it shoots. Fixed-sight guns need to be regulated to their best load. It’s not as hard to do as it sounds.
Not long ago, a chap rung up the Bowen Classic Arms shop and inquired after sighting in his fixed-sight revolver. After advising him the Brown Shirts at OOPS would spear him $75 to $100 for roundtrip airfare, the caller logically asked if he could sight in his gun himself. Good question, so I proceeded to explain the rudiments of the procedure. Oddly enough, some folks keep house without a lathe and milling machine (an awful prospect) so we discussed a scheme for the job, which utilized home shop tools and materials. By then, I was curious to see if this would really work.
Sighting in a revolver is no mystery and mortals of ordinary dexterity are fully capable of undertaking the task. In addition to a well-installed bench vise, you will need a few simple tools — a smooth-cut file, hacksaw, handsaw, wrench or two, power drill, caliper, calculator and a few other items. Even if you have to go out and purchase everything, you’ll amortize the costs on your first sight-in effort. Unless you’re unlucky and could wreck a crowbar, it is extremely difficult to irreparably damage any of the gun parts involved, though vintage-style SAAs do require a softer touch than the hardier Rugers.
The industrial-strength barrel vise with its contoured brass inserts is
usually found only in a working shop. It is capable of exerting tremendous
pressure and can damage barrels if used injudiciously.
A wooden action wrench works very well for single-action revolvers and
won’t mar the finish. One a couple of feet long provides ample leverage to
overpower all but the tightest barrels — provided the barrel doesn’t spin in the vise.
Your Own Master
So why undertake this job yourself? Aside from the obvious savings of time and money, the most important reason is you can do it better than anybody. Sighting-in guns for someone else is a frustrating exercise. No matter how precisely a gunsmith regulates sights, he does so with his hands, eyes, ammo, shooting style and at his range in his ambient light — not the customer’s. Each shooter’s results will almost certainly differ in terms of point of impact. Even adjustable-sight guns occasionally require barrel clocking to get the front sight positioned where sight regulation occurs in the middle of the operating range of the rear sight. There is no reason in the world why you shouldn’t give this a try.
There are a couple of preliminary considerations. Obviously, fixed-sight guns are best regulated for a specific load as any change of ammunition can change the point of impact. You’ll want to try several types of ammunition to see which shoots best. Remember also to check the chamber throat diameters before starting testing, as adjustments may be necessary to realize best possible accuracy. Another thing is how to shoot the gun? Offhand? From a rest? This is largely a matter of personal preference but bear in mind sighting results achieved from a rest at a specific sight setting may not carry over into the offhand position because the gun will behave differently in recoil and usually dispense shots to a different place. In my humble opinion, fixed-sight revolvers should be regulated by firing off hand from one’s own hind legs as the gods intended since most fixed-sight revolver shooting is not conducted from a rest.
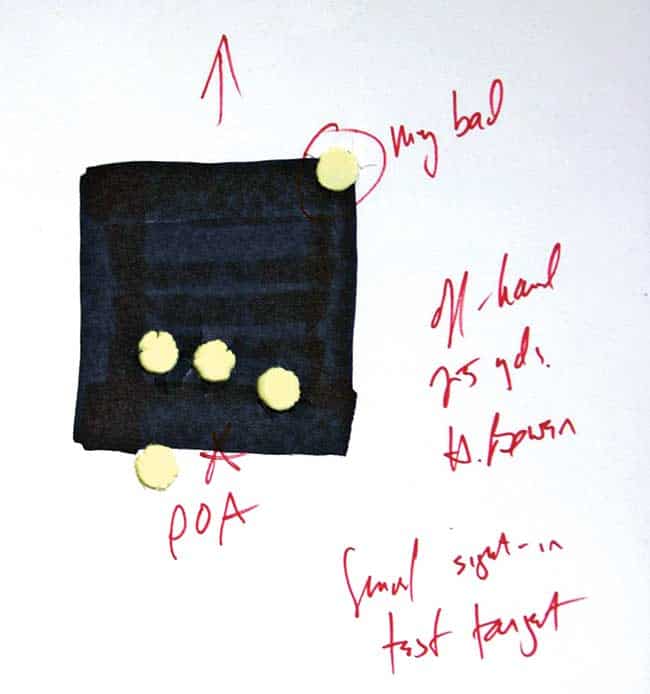
It will take some doing but this is what you can achieve with a bit of careful effort.

Here’s a typical sighting problem and the plot of corrective adjustments.
The Theory Part
There are two components to sight regulation: Elevation and windage. Ordinarily, the elevation is simplest to adjust (and the easiest to screw up) without special tools. The front sight height controls the elevation. The taller the front sight, the lower the gun shoots. Some revolvers — Ruger Vaqueros are an excellent example — often have sights too tall to regulate with standard ammo. Sighting in consists of shooting a group to determine the point of impact and then filing down the sight to bring up the group to the point of aim.
If you are unlucky enough to have a gun shooting high, you’re in trouble. Some guns arrive from the factory perfectly “sighted in” for, say, 675 yards. In this case, your gunsmith may be able to weld up and reshape the sight blade. This is an aggravating undertaking and many gunsmiths may recommend replacing the barrel, often less costly than repairing the sight blade. The moral of the story is take special care when filing in a sight blade. Once you’ve shot a group to determine regulation, making the actual adjustments is quite simple and requires only a sharp smooth-cut file, caliper and calculator. The barrel is held in a padded vise and the sight blade filed to height. Keep the initial cuts parallel to the barrel axis and reshape, polish and cold blue after adjustments are made. Here’s a simple formula for determining how much to cut:
Sight radius x distance to move group ÷ range to target in inches = POI movement.
For example, if your gun has a sight radius of 8″ (the distance between the back of the front sight blade and the rear sight notch), you’re shooting at 900″ (25 yards) and you need to raise the point of impact 2″, the equation would be: 8 x 2 ÷ 900 = .0177″. Not much, something best measured with a caliper. Remember cut slowly and carefully. Round it down to .017″. You can take more off, but putting it back on is a chore.

The component parts of a homemade barrel vise ain’t pretty but will do the job.
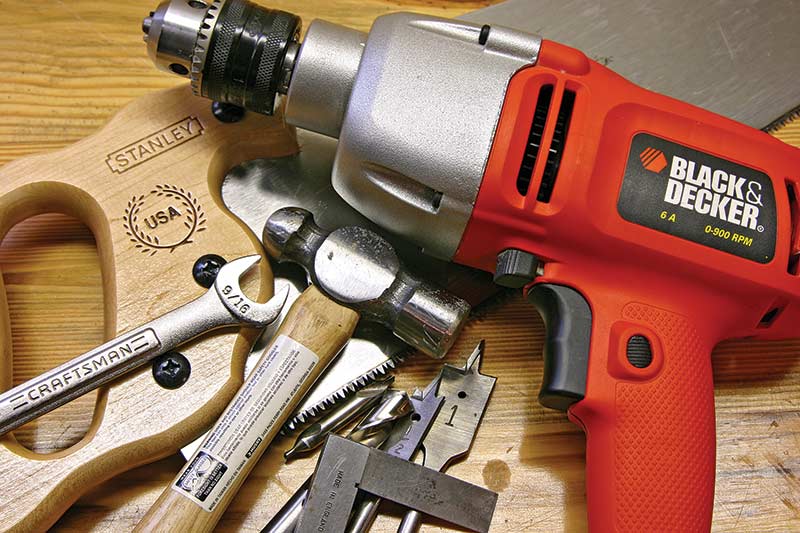
All you need are simple hand tools any semi-handy man ought to have.
Don’t have ’em? Now you have a good reason to buy ’em.
The Real Work
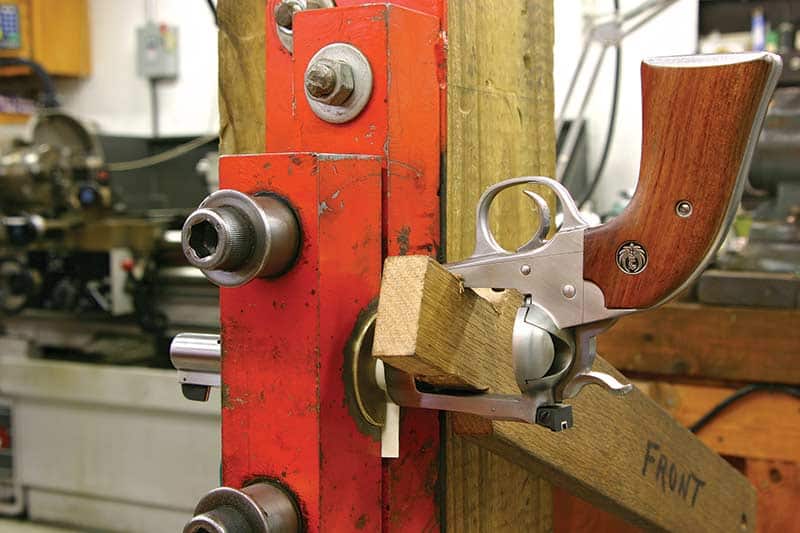
Now for the tricky part where the scrounging and tool making come in. Adjusting the windage requires that the barrel be “clocked” one way or the other. The hard part is holding the barrel tightly enough so it doesn’t spin while turning the receiver. Ordinarily, a gunsmith would use a powerful steel vise with contoured inserts with enormous holding power. You can make a simple barrel vise that will usually work as well and cost almost nothing.
If you don’t have a good scrap woodpile, visit your local building supply house and ask about some hardwood scraps. You will need a piece about 1″ thick and 2″ to 3″ wide and about 24″ to 30″ long to serve as an action wrench. You’ll also need two pieces of this material about 8″ to 10″ long for the vise blocks. Oak stair runners ripped to size are perfect. Then, see your local steel supply house and ask for a couple of pieces of 11⁄2″ to 2″ wide material 8″ to 10″ long and about 1/4″ to 3/8″ thick. Both the short wood and steel pieces should extend past the ends of your bench vise jaws at least a couple of inches. These four pieces of material will comprise the vise jaws. Cut all to a uniform length if you forgot to have the wood and steel yards do so for you.
Layout and drill holes an inch or so in from the ends and at the center of all the pieces using a ruler, square and prick punch. Just do these by eyeball as well as you can — this thing isn’t going to the moon. I’d recommend using at least a 3/8″ drill for 5/16″ clamping bolts. A 7/16″ drill and 3/8″ bolts would be better. Once you’ve got all the holes drilled, determine the bolt length necessary to keep your steel and wood sandwich together. My advice is to use fully threaded rod, which you can cut to length with a hacksaw. Leave an extra 1/2″ or so for a jaw spacer. Use nuts and washers on the bolts.
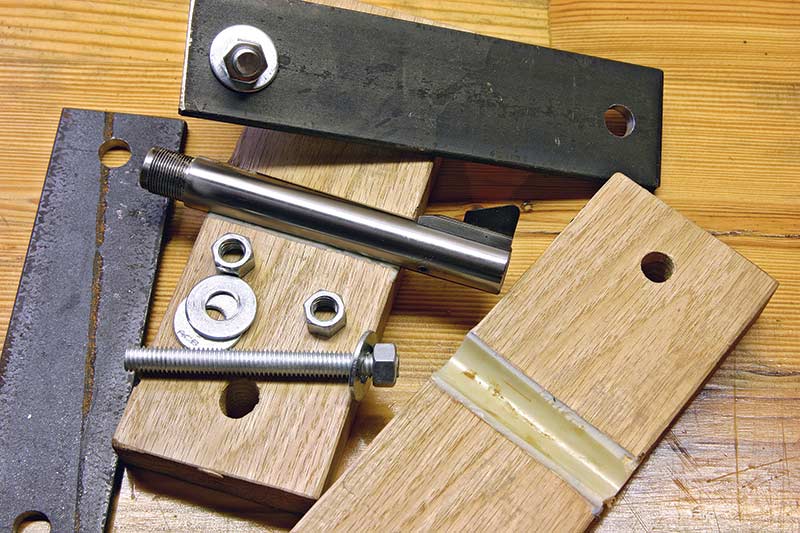
The things backyard barrel vises are made of. Materials should be
readily available just about everywhere.
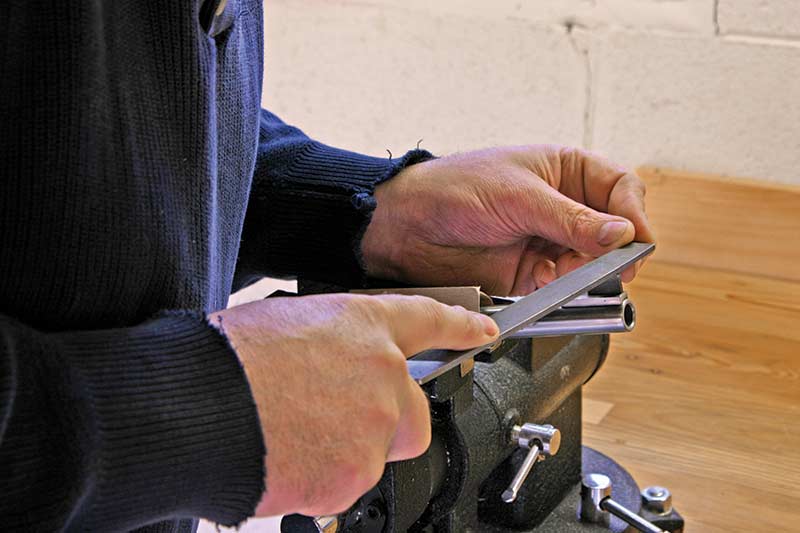
Filing the blade to height and shape is not as easy as it looks if you haven’t
done a few thousand of them. Go slow and check your work often since it
is much easier to remove material and replace it.
Keep Your Fingers
A word or two on safety. Drilling3/8″ to 1/2″ holes with a hand drill in a piece of steel is a job undertaken by only those with weak minds and strong hands. Best to outsource this to your local machine shop unless you have a drill press. It can be done but it’s all too easy to break a finger or get whipped by a drill run amuck. Always wear safety glasses when drilling, hammering or shooting for that matter.
Once the barrel vise components are assembled and bolted together, drill a hole through the sides of the wood inserts using a 1″ spade bit. This completes the vise jaw work except for fitting. Obviously, this 1″ hole is too large to hold your barrel and needs to be contoured precisely to the barrel taper. Brownells Acra-Gel stock bedding compound will form a perfect fit. Remove the cylinder, base pin and ejector housing from the gun. Apply one layer of masking tape to the barrel without gaps or overlaps and then apply the release agent over any part of the barrel and receiver that might contact the Acra-Gel. Apply a bit of duct tape to the wood blocks on either side of the grooves formed by the hole in the jaw assembly. This will serve as a release agent for the wood. Then mix the Acra-Gel per instructions and gob it into the grooves in the wood blocks. With one block lying on your bench, lay the barrel in the slot in the glass, place a couple of thin spacers — 1/8″ to 3/16″ will do — on the block and then apply the other wood block. Once you’ve got this part of the sandwich done, apply the steel straps and tighten up the hardware. Let it dry overnight.
Now, make up your action wrench. Narrow a section on one end of your long piece of oak to go through the cylinder window in the receiver. It ought to be about 11⁄2″ to 13⁄4″ wide for at least 3″ or so. When wrenching, the wide edge should be vertical and as close to the barrel as possible.
Disassemble the vice assembly and chisel or sand off any excess gel from the blocks. Now you can start the sighting job. Because the Acra-Gel is quite slick, chances are it won’t grab and turn the barrel so put a wrap of clean paper around the barrel for traction. The wrap of tape on the barrel applied earlier leaves clearance for the paper. The spacers used initially are left out now so the assembly can exert its maximum pressure. Assemble the barrel vise components around the barrel and tighten smartly. Clamp this assembly in your bench vise. Orientation is not critical but maximize contact. Just take care that you don’t ding up the revolver wrestling with it.
Bear in mind the bench vise isn’t imparting much of the clamping force here. Insert the fancy action wrench and move that barrel.
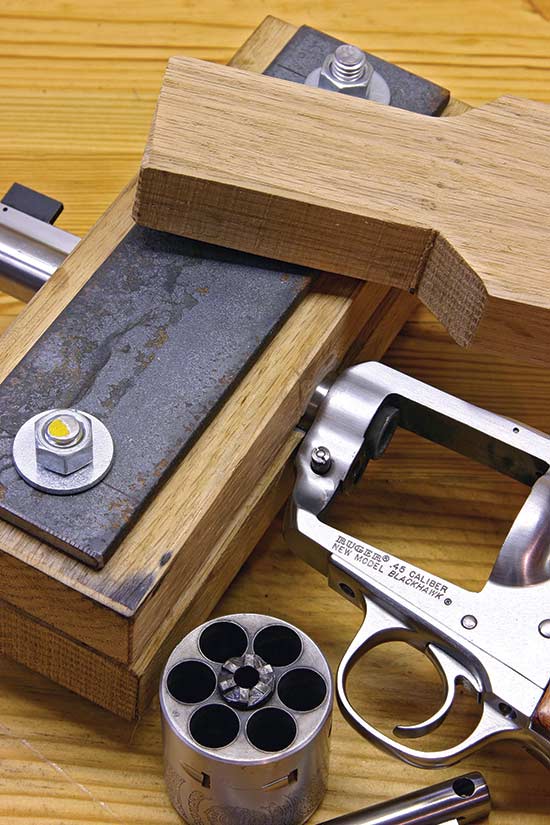
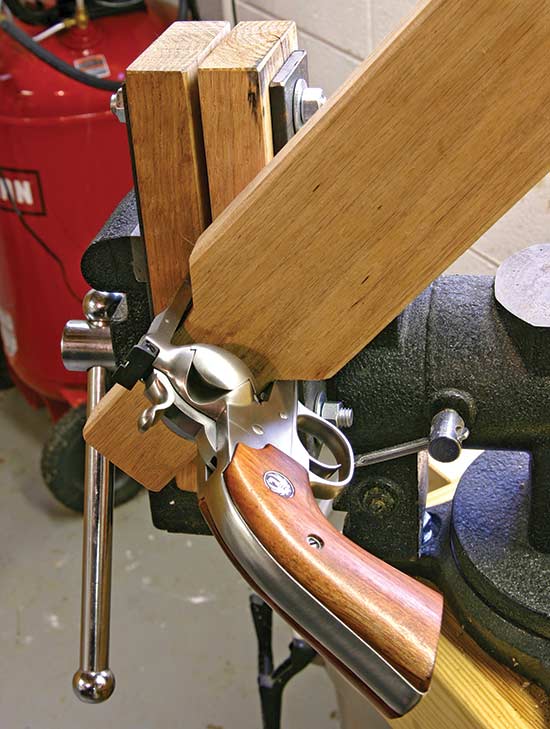
This is what it looks like once all the bits and pieces
are assembled with the barrel in place.
Life’s Little Lessons
A couple of helpful hints on turning the barrel. All known revolver barrel threads are right handed. For those who are spatially challenged and whose parents didn’t tattoo an “L” and an “R” on the backs of their respective hands at birth, remember: Righty tighty; lefty loosey. Secondly, this wrench and vise arrangement is capable of exerting tremendous force but, alas, dedicated professional/industrial barrel vises are capable of exerting even more.
Some barrels are set so tightly at the factory this homemade setup simply will not suffice. If the barrel spins, try to retighten the vice or add some powdered rosin to increase grip. Just bear in mind bluing damage could result when the barrel spins, especially if any grit finds its way into the glass or paper. Try to loosen the barrel and then tighten back for adjustment purposes. If you can’t turn the barrel, admit defeat while you’re ahead and consult your gunsmith.
Depending on the sight radius, it won’t take much movement to change the point of impact. Without elaborate measuring tools, a surface plate, gauges, etc., our sight movement formula isn’t practical to use so you will have to tinker some with this. A little experience will show you how much. To keep track of the barrel’s position, make a small prick punch mark at the juncture of the barrel and receiver, preferably below the barrel where it won’t show. Quite often, you have to move the barrel just a portion of the punch mark to achieve proper regulation.
Regulating revolver sights is not complicated. Don’t be intimidated by the job. Since everybody’s materials and tools are different, you’ll have to make some minor adjustments to this procedure. But it’s all here — with some experimenting, anybody can master the work. Not only is doing the job yourself especially satisfying, nobody can do the job better than you can.
BROWNELLS (ACRA-GEL)
200 SOUTH FRONT STREET
MONTEZUMA, IA 50171
(800) 741-0015
WWW.BROWNELLS.COM
LOCAL HARDWARE STORE (TOOLS, LUMBER)
MAIN STREET
ANYTOWN, USA 12345
SCRAP PILE (STEEL, WOOD)
WHEREYOUFINDIT STREET
ANYWHERE, USA 12345