Steyr Grip Panel Refit
Make Your M1912 New Again

To fit a set of reproduction grips from Vintage Gun Grips, you’ll
need 100, 150, 220 and 320 grit sandpaper, needle files, and a
sharp utility knife. A caliper for measuring and some black
epoxy can be helpful too.
I hate ugly, busted-up grips. On occasion, I’ve bought a duplicate of a vintage handgun in my collection just to pirate one good grip panel to upgrade the pistol I already had. This can get pretty expensive, and I admit it might even be a form of mental illness.
Fortunately, Vintage Gun Grips offers a practical alternative.They are famous as makers of reproduction cast resin grips for an absurdly variety of discontinued, obsolete and antique handguns, along with buttplates, and mounting hardware. They were bought some years back by Triple K Manufacturing leather holster and magazine folks, who now maintain the hundreds of molds from their library.
Triple K will cast grips on demand for you in a number of colors. Prices generally fall between $42 and $52 a pair. If your gun originally had hard rubber grips, the reproductions can be hard to distinguish from the real thing.

Level off any imperfections on the back of the grips with sandpaper.

(Left) Level off any imperfections on the back of the grips with sandpaper. Scribe lines to mark the top of the grooves (middle) you’ll need to carve. Carefully and gradually carve out a “V” groove (right) where the outside (upper) side of the groove is parallel with the back side of the grip. The utility knife blade is ideally shaped for this operation.
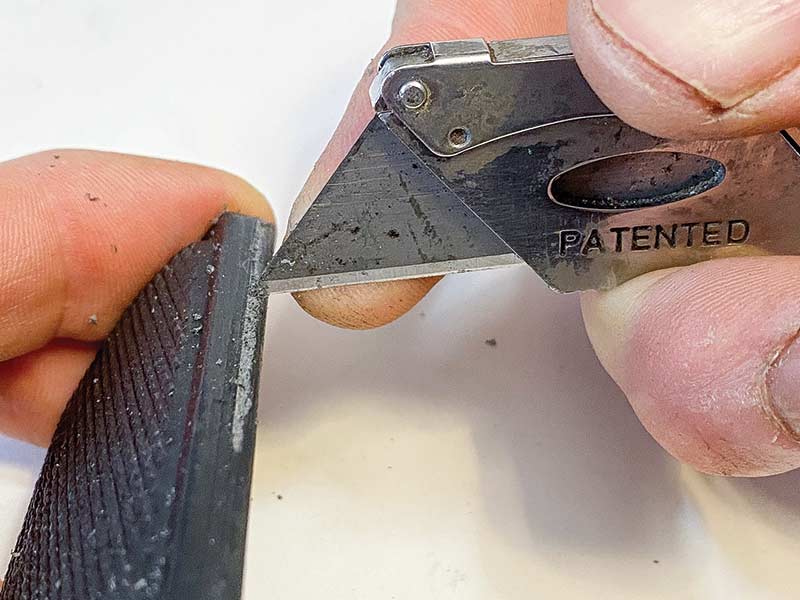
Carefully and gradually carve out a “V” groove where the
outside side of the groove is parallel with the back side of the grip.
The utility knife blade is ideally shaped for this operation.

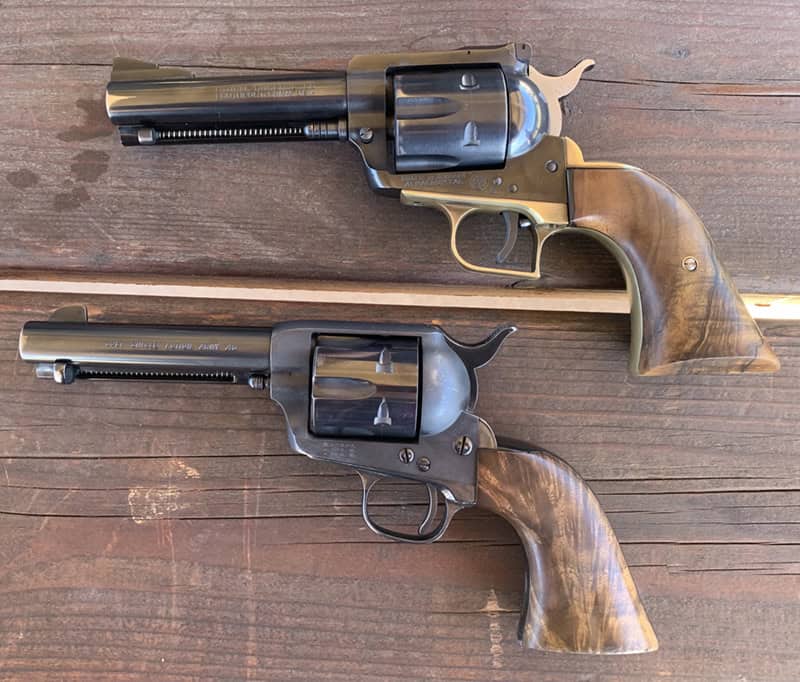
Once the top is trimmed, you’ll need to reshape the corners of the grip (left) for it to nest correctly with the goal of getting the grip screw holes to line up with the hole in the frame. Originally, the 1912 Steyr (right) had wooden grips but the new Triple K resin versions make the pistol shootable until Frank can spend time in the wood shop.

Originally, the 1912 Steyr had wooden grips but the new
Triple K resin versions make the pistol shootable until Frank
can spend time in the wood shop.
Totally Authentic
Like the real thing, the repro grips often need some hand fitting too. The Austrian military Model 1912 Steyr is one of the more complicated grip fitting operations I’ve encountered, so I offer up my recent experience here in hopes it will help anyone similarly inclined.
Unlike most handguns, the Model 1912 Steyr grip panels are dovetailed into the steel grip frame along the front and rear edges to prevent any shifting once installed. The single screw at the bottom goes through the left side grip panel, completely through the grip frame and protrudes into the right side grip panel, preventing any vertical movement. This is a very secure but labor intensive grip to manufacture and design.
Because the new reproduction grips are cast with a little extra material on the edges, they won’t slide into place. To fit the grips to your gun, you’ll need to do the following, in order:
• Begin by inspecting the backside of the grips for high spots and sand them down flat by placing a piece of 80 to 150 grit sandpaper down on a hard, flat, surface. Gently and evenly move the grip over the paper with light pressure. Check for flatness with a steel ruler or a countertop.
• Lay the front and rear edge of the grip panel inside the steel grip frame window and hold it tightly against that edge. Use the metal edge as guide while scribing a line in the resin with the tip of a needle or the tip of a new, sharp, utility knife blade. These lines represent the upper limit of the “V” groove you will carve cut.
• The point of a utility knife blade forms a 45º angle. With the top (unsharpened) part of the point held parallel to the backside of the grip panel, you will carefully — over the course of several passes — carve out a “V” groove from top to bottom. Remove less material than you think you need to on the first grip edge then switch to the other edge, once again halting before you think you need to. Test to see if the grip panel will slide fully up into the window. If it doesn’t, note how much more material needs to be carved or filed from the groove, remove it, and test fit again until you have a snug fit between resin and frame with the backside of the grip seated flat against the face of the frame window. If you remove too much material, black epoxy can be used to build up the material again.
• At this point, you should be able to judge if the molded-in clearance channels on the back of the left hand panel need widening. Use a small file with the safe edge bottomed in the channel to widen the appropriate side as needed.
• Once the panels can slide on fully, note the gap between the top of the panel and the top of the window, how much of the panel is hanging over the butt of the grip, and how much the panel needs to move up to line up with the screw hole. I had to remove excess material from the tops with sandpaper, and then reshape the rounded corners to nest up tightly against the top of the frame window. Proceed carefully and stop before you think you should for test fitting.
Great care must be taken when sanding away excess resin to keep the top of the grip straight. Once the tops of the panel are flush with the top of the window with the screw holes lined up, clear the screw holes of any excess material and install the screw. In my case, the bottom of the left grip turned out perfectly flush with the butt of the grip frame but the right panel needed about 2/32″ sanded away match it.
• Any air pockets in the resin exposed by sanding can now be filled with black epoxy if you desire. Final polishing out of the sanding lines is done with finer grit sandpapers going beyond 320.