Home Project: Rust Bluing
The Amazing — and Achievable —
Process of Refinishing Your Own Gun

The barreled receiver on the top looked exactly like the one
below before 20 minutes of work with a coarse wire wheel
removed the red rust, leaving a dark patina.
In this age of black modern sporting rifles, bluing as a firearm finish seems to have gone out of style. As guns change, so do gun finishes. Bluing and related browning are traditional processes for protecting and improving the appearance of ferrous metals (those containing iron). With so many guns made of aluminum and polymers, bluing obviously can’t be the universal finishing solution for gun manufacturers it once was.
Even if we just considered steel guns or the steel parts of guns, bluing is just one of many finishing options; and the truth is it can’t offer the protection level of more technologically advanced finishes. For example, phosphate coating (Parkerization) became widespread on military arms in World War I because of its superior corrosion resistance. The development of incredibly durable epoxy and ceramic paints combined corrosion protection that didn’t need oiling with unprecedented color options. More recent advances like nitride coating offer protection against rust and wear earlier finishes couldn’t even approach.
As a protective finish, bluing is now far removed from the apex, but on certain guns (especially vintage guns) and among traditionally minded shooting enthusiasts, it remains highly desirable for its beauty. Perhaps, like me, you have a few old guns around that could stand a quality re-blue. The question to ask yourself is, “Is the gun worth the cost in time and treasure to re-blue?” If you have more time than treasure, rust bluing could be a great option for you.

To avoid rusting the inside of the barrel, it is heavily greased or painted with lacquer to protect the rifling.

A selection of mini-wire wheels and brushes for your rotary
tool for the hard-to-reach areas can really speed up the metal prep.
All the scale and dirt have got to go.

Greased wooden or rubber plugs are driven tightly in the breech
and muzzle, and stay there through the whole rust-bluing process.
Rust Bluing Requirements
There are several techniques for bluing guns, but this article will focus on rust bluing because it is the most DIY-friendly method. Rust bluing doesn’t require the metal to be in high polish (anything over 320-grit is counterproductive) and doesn’t cost much in materials. My rust bluing kit includes a bottle of Brownells Classic Rust Blue ($15), a flea market stainless steel hemostat ($5), 0000 steel wool pack ($4), a heat source in the form of a secondhand RV two burner electric stove top ($35), a bathroom (two came with the house when I bought it), a tiny jar to transfer bluing solution into for use so the big bottle isn’t contaminated, a rubber bungee and wire coat hanger to suspend the parts from, clean cotton patches (a lifetime supply made from my torn-up old pajamas), a few parts-cleaning brushes with fine stainless steel bristles ($5), a few pairs of nigh-indestructible purple nitrile rubber gloves, Dawn dishwashing liquid, a clean toothbrush, a jar of lacquer thinner, a roll of paper towels, gallons of the right water (more details later), and finally, some steel boiling pans of various sizes I found over the years on the roadside.
Of all the above items, the pans might be your big expense if you aren’t a long-time packrat. They need to be steel, strong enough to support the weight of enough boiling water to cover the parts, and big enough for you to get your biggest parts in. It’s easy enough to find those narrow, rectangular, stainless-steel pans used in the restaurant industry at yard sales, flea markets, or Tom McHale’s unlocked garage. They are great for your pistols, rifle bolts, trigger guards and smaller parts. The problem is finding a pan long enough for a barreled long gun receiver. Fortunately, Brownells makes an excellent 40″x6″x6″, 4.5-gallon capacity, 18-gauge welded black-iron bluing tank ($147) that will last a lifetime. At this price, I doubt it would be worth an amateur’s time to try to make one themselves.
If your material costs for rust bluing are under $200, you are still well below the cost of the typical commercial hot blue job. If you want to rust blue several guns, the investment is well worth it.


The finished rust bluing, oiled and allowed to
sit for 24 hours to cure the surface.

Rich red rust is the result.
Rust Bluing Process
To clarify, rust bluing and hot bluing are not the same as cold bluing. Compared to rust or hot blues, cold blues wear/rub off easily. Cold blues basically just color the surface of the metal to improve its appearance without improving corrosion protection. By contrast, rust or hot bluing is a passivation process for ferrous metals that improves rust protection by an electrochemical conversion process changing the metal surface to a black oxide of iron called magnetite (Fe3O4). Because magnetite is less reactive than the base metal, it provides some protection against corrosion.
Rust bluing, sometimes called “slow-rust bluing,” is very labor intensive, which is why it was replaced by hot salt bath bluing (hot bluing) in manufacturing over a century ago. In the rust blue process, a minuscule amount of acid is wiped on the surface to be blued and allowed to dry for a few minutes before the part is set aside to rust. The acid promotes the formation of red rust (Fe2O3). As soon as the part is adequately rusted, it must be boiled in water for 20–30 minutes to transform the red rust (red oxide of iron) into black oxide of iron. After the conversion, the part is removed from the boiling water, and dried, and the black oxide residue is carded off the surface with steel wool to reveal the newly blued surface beneath.
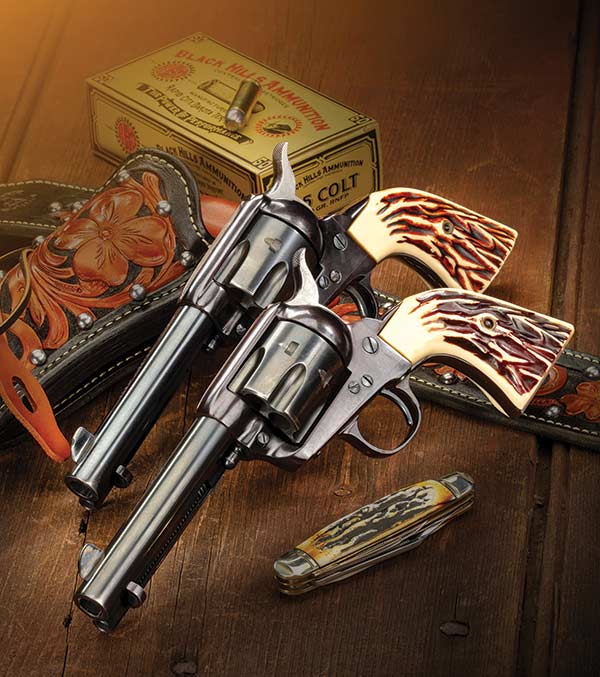
The process is repeated again and again (from six to 20 times) until the desired depth of color is achieved or, theoretically, until the surface no longer rusts. When you have the finish where you want it, the bluing is oiled and allowed to set for 24 hours to cure. The resulting finish is as durable as any bluing can be. By its nature, the rust bluing cannot produce a high polish surface finish of the type you would see on classic Colt or S&W double-action revolvers. Instead, the surface has a subdued, semi-matte quality with colors ranging from bluish-gray to bluish-black. It’s an elegant but business-like finish in it for the long haul.
If you lack patience, rust bluing may drive you insane. Even with patience, there are plenty of ways for the process to go sideways, which I’ll share with you based on my experience. The good news is I discovered rust bluing doesn’t actually require all the tedious metal preparation steps some instructional sources would have you believe.

Frank gives the parts two scrub downs with a toothbrush, boiling
water and Dawn dishwashing liquid to get all the oil and grease
residue out of the nooks and crannies.

Apply the bluing solution so it just moistens the surface of the
metal without flowing or running. Use long strokes with minimal
overlap and avoid rubbing excessively in any one spot.

The side of this barrel was polished to bare metal to remove an
import mark, yet it took the blue as evenly as the patinaed metal.
Cleanliness Rules
Two aspects of efficient and successful rust bluing that can’t be overemphasized are the need to keep the parts free from contamination and the need for a source of free water suitable for boiling the parts to convert the red iron oxide to black iron oxide.
If you don’t get and keep the metal parts clean and free of dirt and oil, you can’t rust blue them. Brownells Classic Rust Blue needs a completely clean, oil-free surface to stick properly. Most rust-bluing compounds are like that. Laurel Mountain Forge is an exception in that it can go on over some slight oil residue. After the initial cleaning, good housekeeping and handling procedures can keep the metal clean through the complete, multi-cycle, rust-bluing process.
Every time you have to clean and degrease the parts, you’re sinking more time into an already lengthy process, so it pays to prevent the parts from being contaminated. Plan for a clean place to lay your parts when you work on them and between bluing cycles. Because of all the cooking going on, the kitchen is not the best place to rust blue something. There are unnoticed little patches of butter, cooking oil, and other food product residue here and there, just waiting to get on your gloved hands, clothes, and parts if you make the wrong move. To keep the parts clean, I use fresh newspaper, cut-open paper shopping bags, or clean cardboard for a work surface.
The goal is to never let my hands or the parts touch anything that might contaminate them. Oil from your skin will contaminate the surface. Steel wool is also treated with oil, which you must wash off before using it for carding off the black oxide residue after boiling. Remove oil from steel wool and your wire brushes by rinsing them in a cup of solvent like lacquer thinner or simply by washing them with Dawn dishwashing soap in a bowl of very hot water, rinse in boiling water, squeeze them out, and lay them on your clean work surface to dry. If you forget to clean the oil off the steel wool, you WILL realize your mistake. Oil interferes with the rusting action of the acid, which means no bluing action.
Always wear clean nitrile gloves when handling your tools and the parts. I don’t mean the gloves need always be new. I generally use one set of gloves again and again, washing my gloved hands thoroughly in hot water and Dawn frequently, drying them on clean paper towels, and taking off the gloves when I’m done, so I don’t inadvertently contaminate them.
By the way, my parts cleaning process begins with putting on nitrile gloves and wiping down the metal with a clean paper towel soaked in lacquer thinner to remove the majority of the oil and grease from the surface. I fold the towel to a fresh side when it is soiled and keep wiping and folding until nothing is transferring to the paper towel. At this point, I take the part to the hot water spigot and scrub it to suds twice with Dawn dishwashing liquid and a clean toothbrush, getting in all the nooks and crannies, followed each time with a boiling hot water rinse. To my delight, this simple regimen works great.

Clean and hot from the last wash, the parts are ready to have
the bluing solution applied. The hemostat holds a folded patch
made of soft flannel cotton.

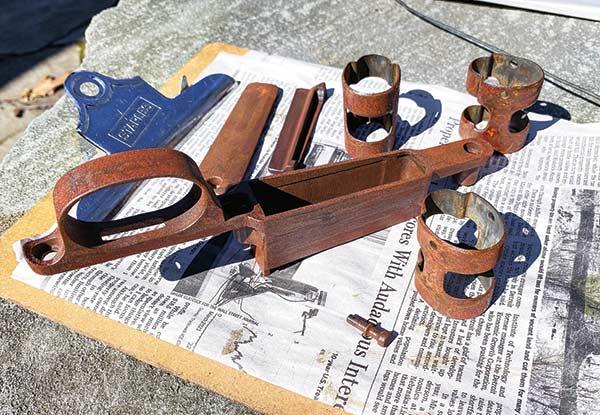
The trigger guard, like the barreled receiver, had some deep pitting.
All of the active rust and compacted dirt and grease were removed
from the metal before rust bluing. The same parts after clean-up
on the wire wheel.

Frank used small brushes and coarse steel wool to
get inside the trigger guard and magazine box.
Water Works
The second mission-critical factor in a successful rust-bluing project is the water. You need a lot of water to boil parts … and not just any water. Some water contains dissolved salts or other contaminants that, while not harmful to drink, will prevent the conversion from red rust to black. For example, while I was doing this rust-bluing project successfully with my home tap water, my wife got a water softener system installed. The new soft water, while a delight on the skin, didn’t allow the red rust to convert. I got some untreated (hard) water from my gracious neighbor, who allowed me unfettered access to his garden hose, and once again, the red rust turned black when boiled. In the future, I plan to test my water supply by boiling a small part in it to ensure the rust will convert before I jump off on a full rust-bluing project.
Since rust bluing requires a lot of water, you’ll want to get it for free. Buying distilled water by the jug gets expensive quickly. For example, using the Brownells black iron tank to boil a barreled receiver, you’ll need four gallons of water for each bluing cycle. If you needed to go through 13 cycles, you would use up 52 gallons of water. At $1.20 a gallon, this just added $62 to your project cost. I wouldn’t dare reuse the water either. When you boil the parts, bits of rust residue and traces of acid get in the water. I pour it out when it cools, scrub the inside of the pan clean with a stainless-steel scouring pad (it will have a ring at the surface level), rinse it out with fresh water, and dry it with clean paper towels.
In these photos, you can see the same parts after rusting, after
boiling and after carding to reveal the rust bluing below.
This was only the second cycle too!


Bluing Solution Application
With suitable water and clean, dry and preferably still warm parts ready on my clean work surface, I turn my attention to the correct application of the bluing solution. To prevent ruining the whole bottle of bluing solution by contamination, I pour a tiny amount into a small glass jar to work with. It is absurd how little solution is actually needed. I make an applicator by folding up a soft flannel cotton patch into a rectangle the size of my pinky nail and grasp in the jaws of my little 3″-long hemostat. I dip the folded patch in the yellow liquid in my small jar and squeeze it almost dry against the lip of the jar. You don’t want the solution to go on wet. Ideally, there is just enough on the patch to moisten the surface of the metal without running.
Work in bright light so you can see what you are doing and have a plan. Apply the solution systematically, in long strokes with as little overlap as possible and avoid going over the same area twice. I don’t know why, but too much rubbing of solution on the metal can precipitate a chemical reaction on the surface that will interfere with the rusting. I’ve had this happen with Laurel Mountain Forge, where the surface turns coppery.
When properly applied, the bluing solution dries quickly, making it hard to tell where you left off. Being systematic reduces the likelihood that you’ll miss a spot. For the first bluing cycle, the standard procedure is to let the first application of solution dry for an hour and then apply a second, even drier coat on top of it. The double coating gives you a second chance to hit any spots you might have missed, so you’ll start the first rusting cycle with a good base. I’ve forgotten to do the second stage application on my first rusting cycle on more than one occasion with no serious problems other than some bare spots that disappeared after a couple of bluing cycles.

Frank uses a solvent-soaked paper towel to wipe off the majority
of the oil and grease residue left on the metal surface after cleaning
off the rust. Don’t rely on solvent alone to get the metal clean enough for bluing.

The velvety red rust turned to velvety black rust. Here it’s colored
whitish-brown due to contamination from the inside of the galvanized boiling pan.

Carding off the black residue with fine steel wool reveals a beautiful
blued finish beneath it. All the residue from conversion has to come
off before you can apply the next coat of solution. It’s actually quite
easy to do by hand.
Rusting Step
Once the surface is dry, the rusting process can begin. How much and how fast the rust appears depends on temperature and humidity. The more humid and warm the environment, the faster the rust forms. It can be as little as a few hours or as long as a whole day. The hardness and alloy of the metal also affect how much it rusts. If possible, you should strive for a controlled rusting environment you can easily monitor. Some people build elaborate rusting cabinets.
I use the bathroom, first filling the tub with a few inches of hot water from the spigot and then running the shower until the mirror steams up. I don’t want too much steam because it will condense on the cooler metal and form large droplets and sometimes streaks, which dilute the acid’s rusting action. (Those defects can be blended away in the next cycle.) I hang the parts from the bathroom shower curtain rod, close the door, and set my alarm to check on them every few hours.
One thing you don’t want to do is forget about your parts. Too much rust can lead to pitting of the metal surface, which will tend to give it a very matte look. Ideally, the metal surface will become evenly covered with a thin, delicate-looking layer of tiny red rust dots giving it a velvety look. After a few cycles, you can get a feel for how long the parts need to rust, and you can set your water to boil, so it’s ready when they are.

Don’t let parts touch each other while rusting. It can take anywhere
from a few hours to a whole day and check often so the rusting
doesn’t go too far and pit the surface.
Boiling
After rusting, it’s time to transfer the parts to the boiling tank. Twenty to 30 minutes of hard boiling will turn the fuzzy red rust to fuzzy black rust. That’s the black oxide we’re looking for. Carefully take the parts out to avoid surface contamination. They need to dry quickly when removed from the boiling water to avoid water spots. Usually, the heat from the boil alone is enough to flash dry the metal. Any residual moisture I dry with a clean paper towel.
Card off the black velvet with your cleaned, oil-free steel wool and wire brushes. You can use a wire wheel, but I don’t think the increase in carding speed warrants the risk of taking off the blue you just spent hours trying to apply. You have to get off all the black surface residue. I use wire brushes to clean out the tight corners and grooves. Once you card off all the residue, you are left with your rust-blued finish. Repeat the process until you have the depth of color you desire.

Convert the red rust to black oxide of iron by boiling the parts for
20–30 minutes. After conversion, remove the parts from the
boiling tank and dry what water hasn’t evaporated.
Project Mauser
For this project, I wanted to experiment with a really craptacular looking,1930s vintage, military Mauser barreled receiver to see how well it would take rust bluing with minimal surface preparation. It was literally covered in red rust from outdoor storage, had deep pitting below the woodline and really couldn’t have looked too much more like a piece of scrap metal than it did. Before I could start the bluing, I had to at least remove the red rust. Knowing what I know now, I would have boiled it first.
My first surprise came after using a wire wheel (and some wire brushes for the tight spots inside the action) to knock off the abundant surface rust. As the red rust came off, the metal beneath had a very dark patina that looked a lot like bluing. I thought to myself, “What sorcery is this? Could it be the legacy black iron oxide finish from when the gun was first blued?” If it was, perhaps I could build my rust blue on this old finish.
Many DIY sources, though not Brownells, state all surface rust and old bluing should be removed before attempting a re-blue. Suspecting this was probably not true, I cleaned and degreased the metal and got the rust-bluing process underway. From the start, the results were spectacular. After three cycles on the barreled receiver, I had to question whether I really needed to continue. It looked that good. The old metal finish, whatever it was, didn’t appear to interfere with the rust-blue application. Similarly, I tried applying the rust blue solution over parts previously hot-blued as well as cold-blued with the same great result. Like the honey badger of internet fame, “Rust blue don’t care.”
For the sake of thoroughness, I set 10 rusting cycles as my target. The harder the metal, the smaller and fewer the tiny rust blooms, and the more applications it took to get a dark, even, blue/black finish. The higher the surface polish, the more applications are required for the same depth of color. Old military rifles, in general, use comparatively soft steel by today’s standards. In my experiment, they proved well suited to rust bluing. Modern alloys are stronger, harder and more difficult to rust blue in the respect they’ll require more applications.
Though it was beyond the scope of this test, I’ve read some modern alloys can’t reach the depth of color achieved on soft steels through rust bluing. This is food for thought if you are thinking about installing a new Lothar-Walther barrel made of 4140 alloy steel on your vintage Mauser receiver. It might be advisable to start bluing the barrel first, see how dark you can get it, and then match the rest of the parts to it. Until then, don’t contaminate your parts with oil and keep on rust bluing.