A Place For Everything
Professional Protection from My Case Builder
My Case Builder produces custom hard cases made to order, either using their DIY system to design it yourself,
or their professional design services. The build quality is excellent, but the design capability or their DIY program
is even more impressive.
Every time I want to do major surgery on a car, a friend of mine in the performance Corvette world reminds me that if I want to do professional work, I need professional tools. Sometimes that means a ratchet with more teeth than usual, so it works in more confined spaces… sometimes it means access to a CNC mill. Obviously, some of these I can afford and some I can’t — which brings us to My Case Builder.
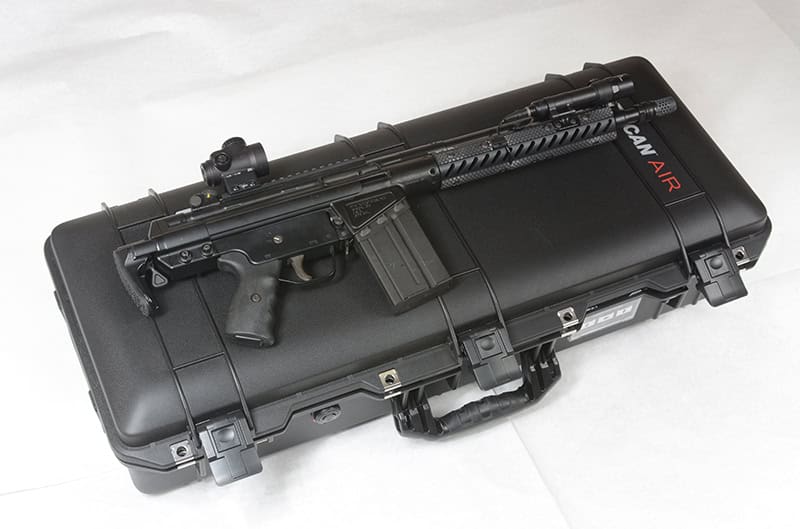
You can order either a case and foam, or just custom foam for your project. I started with Pelican’s Air 1705
case because it was the smallest case that would house the PTR K3P/G3K style build.
I’m a sucker for a hard case: always have been. I’ve also been constantly disappointed in my ability to cut the foam to match whatever I’m putting in it. I’ve used Pelican, UK and others, and tried everything from the pick’n’pluck squares to razor blades, a hacksaw and even attempted to make a hot wire cutter to shape the foam in a racing seat. No luck; I can make it secure, but I can’t make it pretty, and I particularly struggle with compartments that need to have more than one depth. The tools required to cut foam accurately — CNC routers, CO2 laser cutters, etc. — are well beyond what most of us can purchase and then use to learn, especially if we only want to build one case for a specific gun.
This came sharply into focus recently when I was working on building a PTR K3P .308 pistol into a clone of a G3K, a 12” .308 battle rifle that looks like an MP5 on steroids. Befitting the multiple roles in which the G3K was used, the final package includes two full sets of furniture, optics, bipod, spares, suppressor, batteries, etc., which is way too much to keep up with if you don’t keep it all in one place.
I had stumbled across My Case Builder at SHOT Show several years ago and recognized the name immediately when I started searching for custom hard cases. What impressed me most was not only their ability to create professional, one-off cases to order at a reasonable price, but also the software that lets you design the inside of your case. This was especially important for me because I was trying to fit quite a bit more equipment into a case than I had any right to.
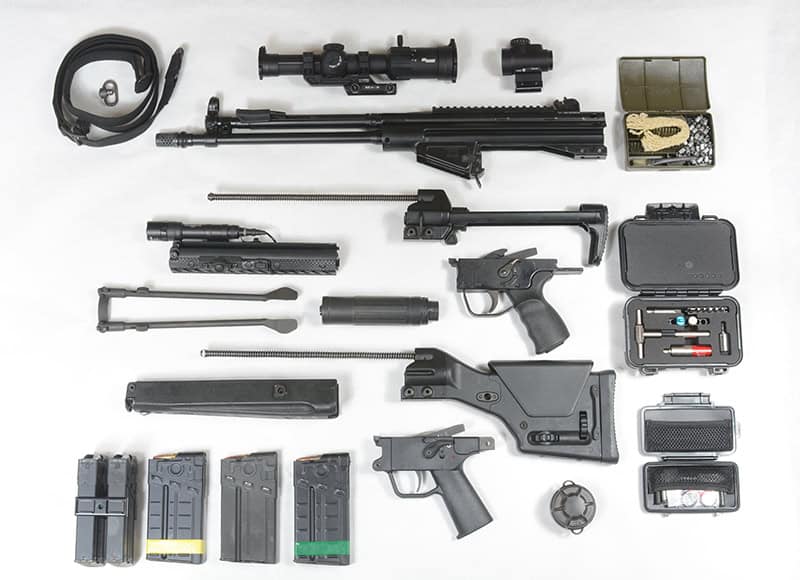
Components of the G3K build: SBR’d PTR K3P .308, A3 and Magpul PRS2 stocks, wide forend with bipod,
M-Lok forend with SureFire Scout light, SIG LPVO, Trijicon MRO, steel G3 trigger housing, Navy trigger housing
with Timney trigger, Dead Air Sandman X, sling, bespoke Fix it Sticks toolkit, cleaning and
spare parts kits, spare 123 batteries and five magazines. Fitting all this into 32” x 12” x 6.5” was a major task.
To give them their due, My Case Builder does far more than simply one-offs. In business for over 35 years, they OEM for a number of different industries that need bespoke protection for equipment ranging from hand tools to musical instruments. Their client list includes Canon, Boeing and Taurus, and some of their work is used aboard Marine One, the Presidential helicopter. The consumer side of the house is a relatively small part of the business and is designed to be user-driven, where you can shop for a case, design the foam inserts and have it manufactured all from the website, without even talking to someone if you don’t want to.
The process is straightforward and laid out clearly on the website, though some of it you’ll just have to do in order to get the hang of it. In my case, they offered me a tutorial session, which is usually an add-on cost, as is professional design assistance.

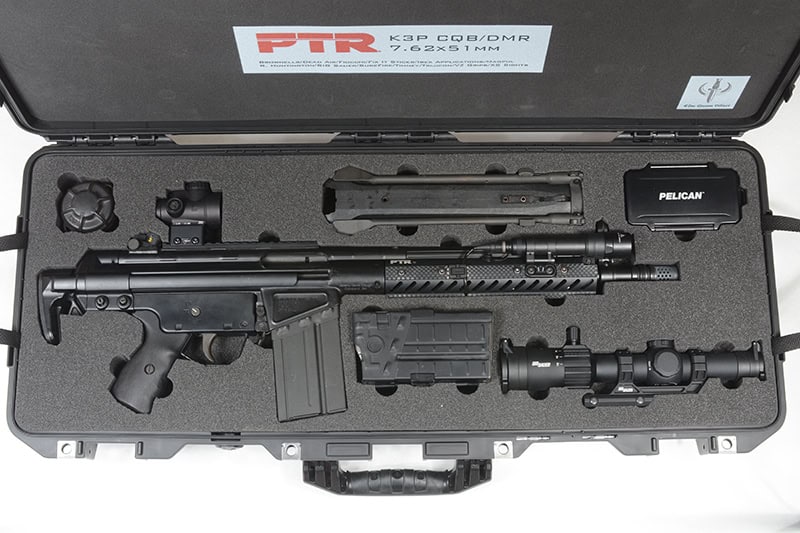
My Case Builder allows you to divide the vertical space into separate trays, a capability that was required
in order to fit all the components into what is still a pretty small hard case.
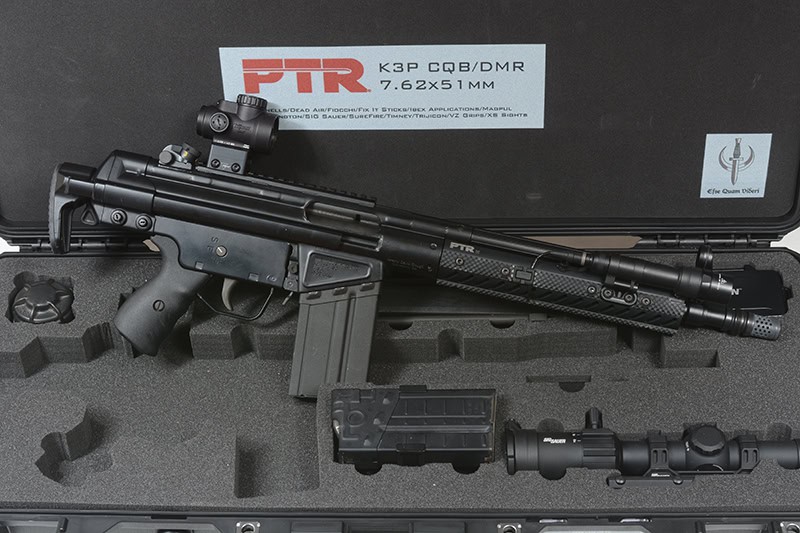
The G3K, upon which this project is based, was used both for CQB and as a DMR rifle. The CQB version
is contained in the top tray, along with clamped dual mags, spare 123 batteries and parts, as well
as a SIG LPVO and wide forend/bipod for the DRM configuration.
You don’t have to order a case from My Case Builder: you can order just the custom foam, which I expect to do with an Apache case I have for a CZ75 build. You will, however, need to have a particular case in mind to know how much space you have to deal with.
For the G3K project, I started by choosing a Pelican Air 1705 case because it was the smallest case that would fit my collapsed SBR, and I wanted the most compact package possible. This is not the easy way, if you were wondering. You’ll also choose which type of foam you want. Options include a TopGuard polyethylene with a higher-density top layer that’s 1/4” thick and comes in black or primary colors, a charcoal ester polyurethane foam similar to what you’d usually see in gun cases, or the firmer ProCell. I chose ProCell, which has an upcharge, for its aesthetics and increased density to help keep the heavy rifle in place and reduce wear.

The lower tray contains much of the DMR furniture, including the Navy trigger housing with Timney trigger,
Magpul precision stock, Dead Air suppressor, sling and color-coded magazines. The smaller cases contain
a G3 cleaning kit and a bespoke toolkit from Fix It Sticks.
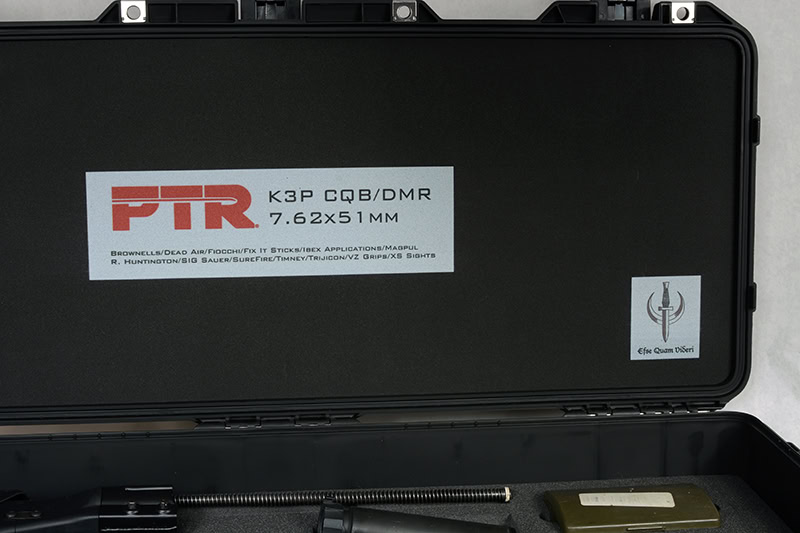
My Case Builder offers foam printing services, and can print photos on the lid, in the cavities, or elsewhere as needed.
I designed a lid label using the PTR logo (which they sent me, and gave me permission to use)
and the names of everyone who contributed to the build. I also added my personal crest
in a separate portion of the lid.
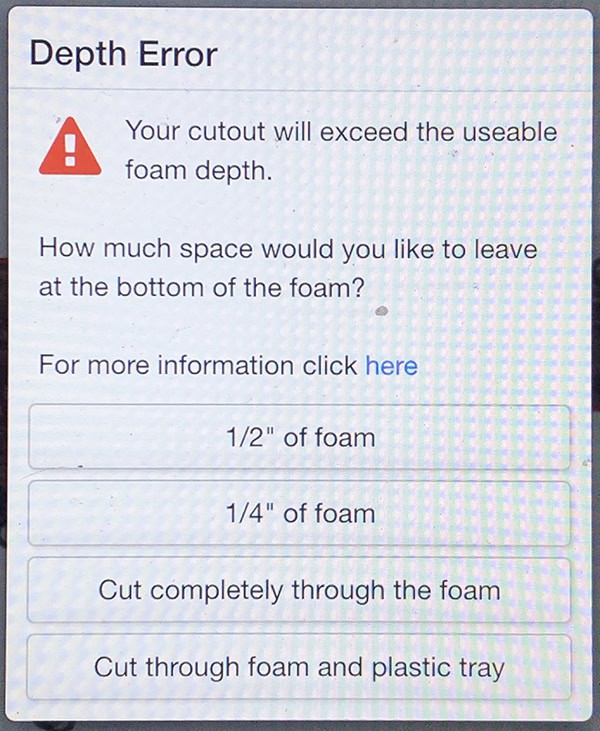
A couple of important things to keep in mind: there’s a certain minimum amount of foam you should have surrounding anything in the case. If it’s too thin, it can’t provide any real protection. Having flown internationally with a Pelican case full of Nikon gear, I find this makes particular sense to me. Another is that every molded hard case has “draft” to it, which means the sides are not perfectly parallel, and the case will be somewhat narrower at the bottom than at the top. Otherwise, it would never come out of the mould in which it’s made. Where this becomes important is that the deeper a cavity goes, the closer it comes to the case’s outer wall, so something with an adequate foam surround on the surface may still be too close to the edge at the bottom. Fortunately, the DIY program incorporates that into what it will let you design.
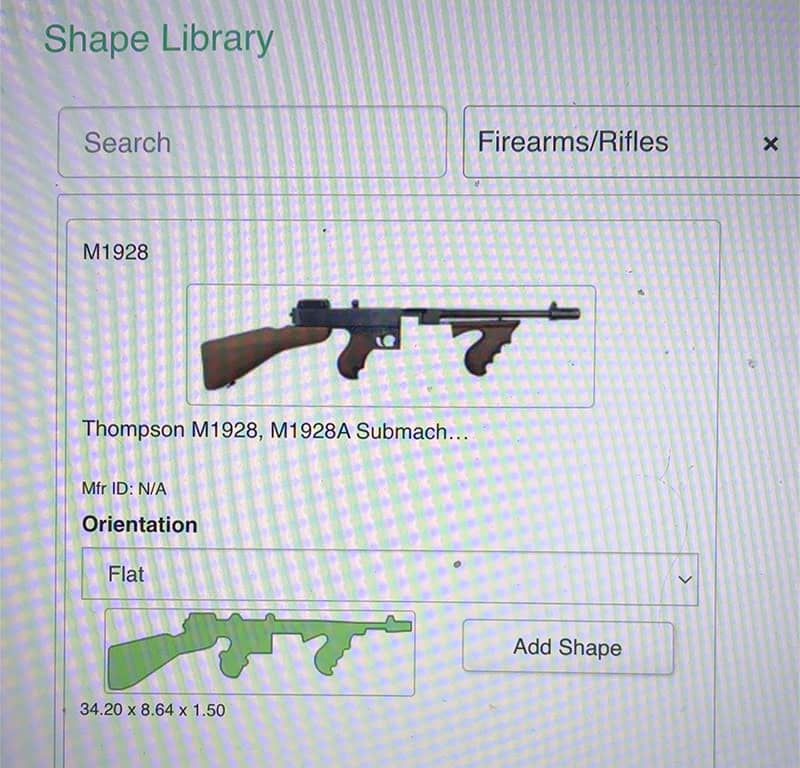
My Case Builder has an extensive image library from which to choose. If you need a case for your Thompson,
you’re in good shape. Most of the G3K project….is not found in the library.
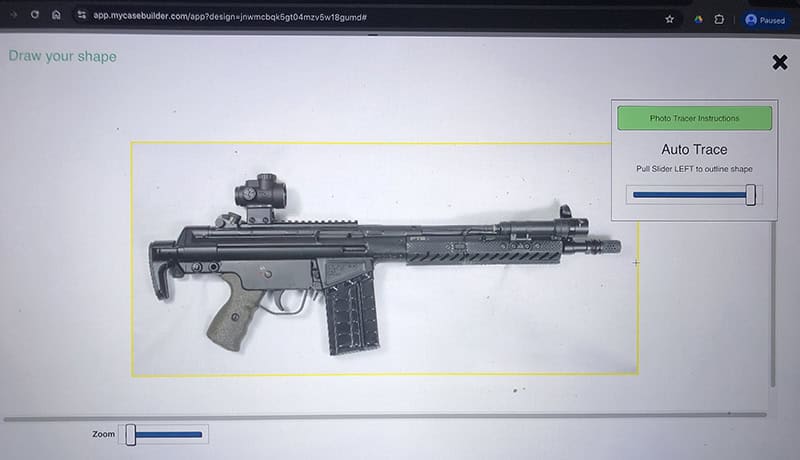
To design the various cavities to be cut out in your foam, you’ll either need to find the image in
My Case Builders extensive library, or photograph your items yourself. Start with a plain white background.
Once you’ve imported your image, the outline tool will start. Use the slider to adjust the yellow line
until it closely follows the contours of your item.
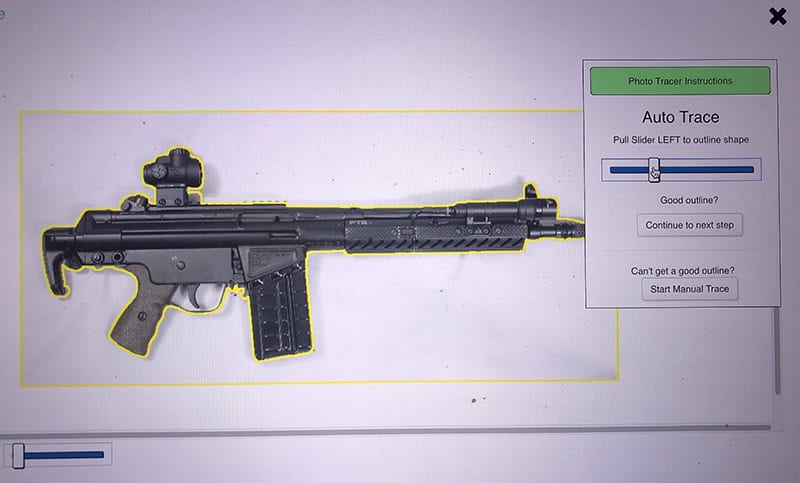
The initial outline, as shown by the yellow line. You want this as close as possible to the part, but not overlapping it.
Before you figure out how to get your parts arranged, first you have to get images of them into the My Case Builder design system. They have an extensive searchable library of images of common firearms and other things, or, as in my case, you need to take your own. You can either use their app on your phone, which will convert your photos into outlines, or upload your own photos (taken on a plain white background) and use their tool to create outlines around the items. Enter the part’s thickness and length, and it will calculate the other dimensions.
Then orient them in the case until they fit… or don’t. It became obvious early on that I had about half as much case as needed for what I wanted to put in it. Fortunately, My Case Builder also lets you design lift-out trays to make even more efficient use of the limited space available.
I also ran into the need for cavities with more than one depth — for the bolts on the LPVO mount, for example, or for the pressure pad for the SureFire Scout light, so it didn’t stay on whenever the gun was in the case. For this, you can either add additional cavities in the bottom of the one you’ve already created (which is what I did to clear the selector switch on the second trigger housing), or separate the “part” into two or more pieces, each with its own depth. That’s how I got adequate clearance for the Magpul PRS2 buttstock, which required three different depths to ensure it was adequately supported.
And other word to the wise: do not neglect to include finger notches. Assuming you’ve made your cavities even relatively close-fitting, those parts either ain’t gonna come out without a notch, or you’re going to mess up the foam badly in short order. There’s a tool that will let you easily add them and orient them correctly on the sides of the part. I used that for most of the parts, but on things like the buttstock and spare mags I created larger notches that went a bit below the part so they’d be easier to remove.
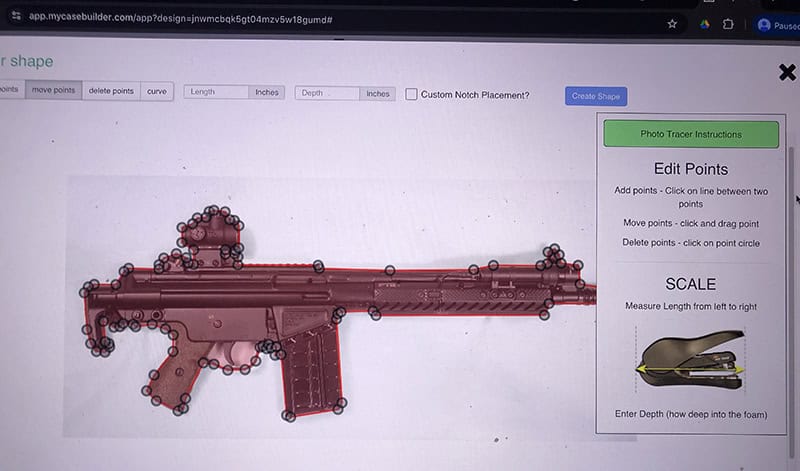
Once you have the outline as close as possible, the next screen will let you move the individual points
that define the outside contours of the shape. You can both add, subtract and move points.
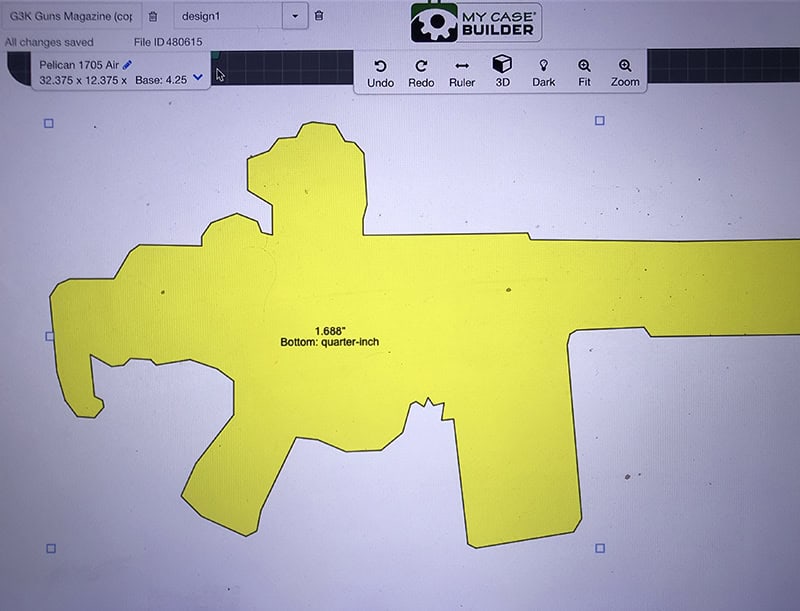
Once you finish the shape, it will appear on the case background. Yellow means the part will cut all the way
through the foam: green, it will have some beneath the part.
Never forget that items in the case don’t just have to fit, they also have to be adequately padded.
All this is the functional part. For aesthetics, you also have the option to add printing to the surface of the foam. Companies that loan out equipment, for example, will often have the bottom of each cavity printed with a photo of whatever should be in that space, which is a clever way to make sure everything comes back where it should be. And yes, they can print photos, and in impressive fashion. For this project, I got permission from PTR to use their logo and created a label for the top featuring it and the names of every company that contributed to this build. I also had my personal crest added.
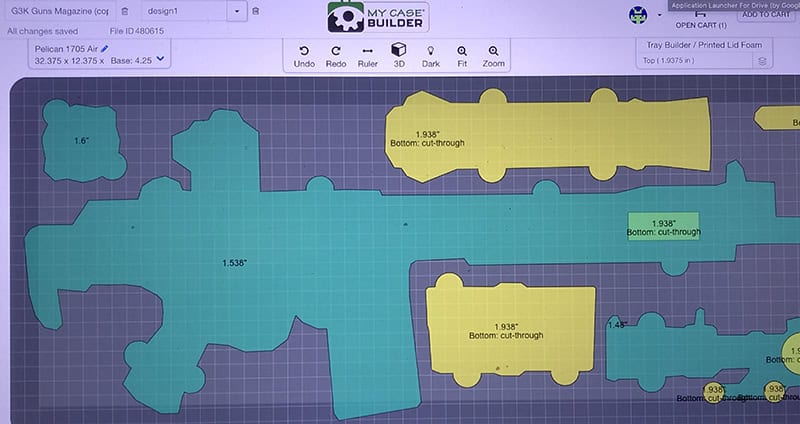
Drag and drop the shapes at will until it all fits, being aware that you need a certain minimum amount
of protection on all sides, and some areas of the part may need different depths than others.
The darker shade around the edges is intended to keep you mindful of this and the case’s draft,
which means the case narrows towards the bottom.
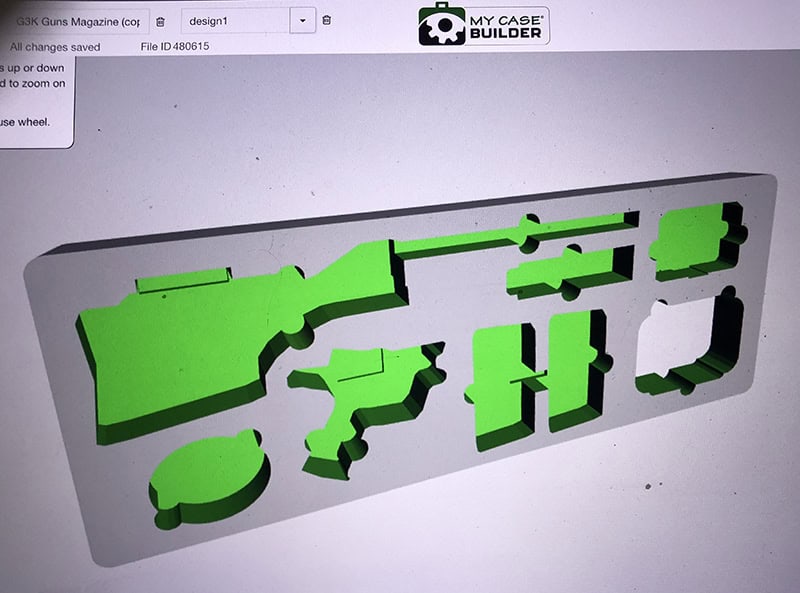
The 3d view feature helps give you a better sense of the shapes you’re creating.
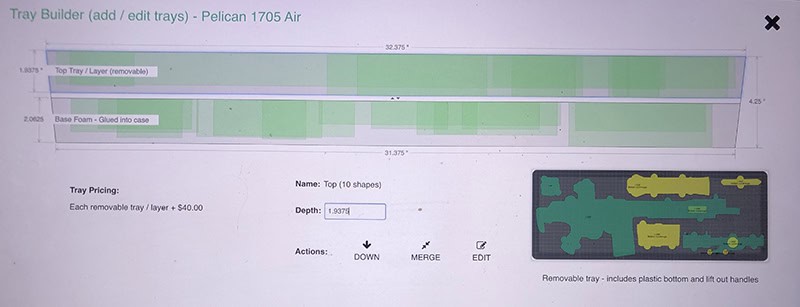
There was absolutely no way everything was going to fit into the chosen footprint—unless I doubled it
by adding a lift-out tray. The tray tool helpfully shows a side view with all the different elevations visible.
When you’ve completed the design, it will be locked as you move through the ordering process, where you’ll make a final selection for case, foam, color (if any), lid printing, and, perhaps most importantly, FailSafe coverage. Starting around ten bucks, this is basically insurance that lets you make changes and have a separate set of foam made if the first does not fit perfectly. I can’t stress this enough: buy it. I’ve taken photos for money for well over 25 years, and even some of my images/shapes were not perfect and benefited from extra tweaking. Follow the process online, return the foam, redesign it, and they will produce the corrected version. Up to you how you do it, but I used a Sharpie to mark each cavity where it needed more room, then adjusted the dimensions in the program.
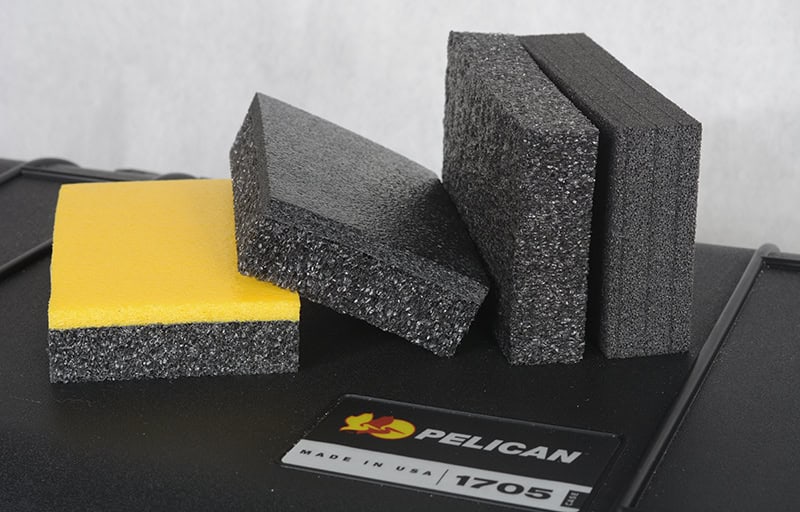
Foam options include (left to right) TopGuard polyethylene option with a 1/4” higher density top layer,
a charcoal ester polyurethane foam similar to what you’d usually see in gun cases,
or the firmer ProCell chosen for this project to help keep the heavy rifle in place and reduce wear.
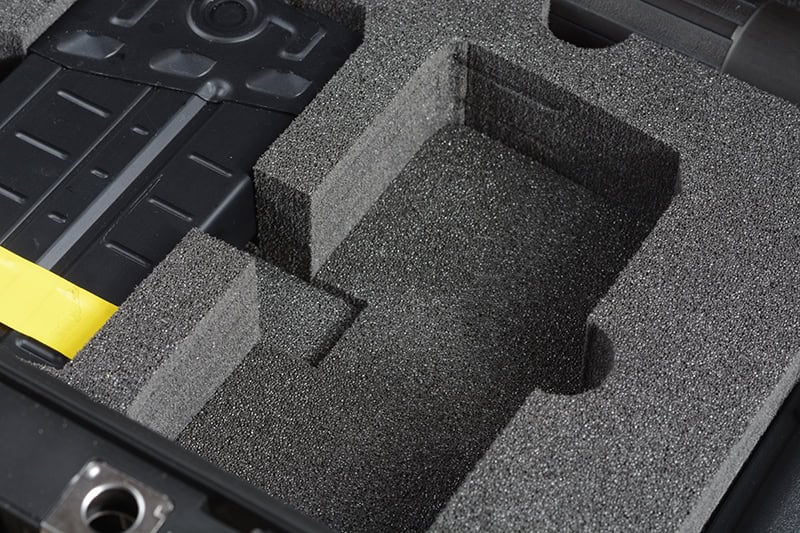
Finger notches are mandatory. The notch tool will help you correctly locate a half-round notch the same depth
as the part (as on the right), or you can create your own a little bit deeper to make it easier
to remove the part — as Jeremy did on the inside part of the foam between these two magazine cavities.

Some parts will require different depths in order to adequately support them. The Magpul PRS2 stock,
for example, needed one depth for the guide rod, one for the endplate and a different one for the body
of the stock in order to be well-supported and lay flat.

If you need to use the Fail Safe service, you’ll have to remove the foam from the case to return it, and then
reinstall the new foam. After carefully scraping off the excessive dried adhesive, I used 3M 20 to attach the new.
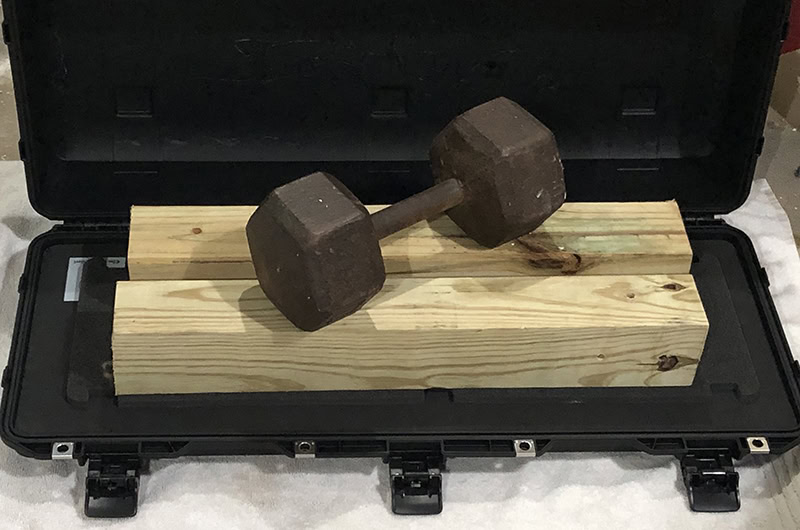
Since 3M 20, like many spray adhesives, benefits from pressure during the bonding process, I used a scrap
piece of foam to protect the insert, then used 4x4’s and a dumbbell to evenly distribute weight
across the insert while the adhesive did its work.
The end result is spectacular. Everything fits, well, and the case looks like it was professionally manufactured for the project. As it was.
CONTACT:
MY CASE BUILDER
www.mycasebuilder.com
(973) 925-7215
PELICAN
www.pelican.com
(310) 326-4700
PTR USA
www.ptr-us.com
(843) 358-2222
Get MORE From GUNS Magazine Insider Every Week!
By submitting this form, you are consenting to receive marketing emails from: . You can revoke your consent to receive emails at any time by using the SafeUnsubscribe® link, found at the bottom of every email. Emails are serviced by Constant Contact