Roll Pins
They Require Special Care In Removal And Installation
I usually talk about some of the more “nuts and bolts” topics involving AR-15’s, but they’re really more about “pins and clips.” This one here will be all about pins. Roll pins. Reason? I just (again) read a “tip” from an “Internet Armorer” revolving around electrical tape cushioning and Vise-Grips in response to someone wanting to know how to seat a roll pin. Great googly moogly!
There’s good reason to invest in the needed pin kit. Even if you don’t plan on constructing or reconstructing major assemblies, something popular and simple (like replacing a bolt stop or fitting up an adjustable gas manifold) isn’t even a little bit difficult. Well, not difficult if you—you guessed it—have the right tools and are prepared with a little know-how. Here’s the how:
Roll pins are hollow steel with a lengthwise split. The pin diameter is oversized to the hole it fits into by approximately the gap width of the split. It squeezes down as it enters the hole and the tension secures it in place. Roll pins have a bevel on each end, but it’s not always enough to get one started. And that’s the first trick: getting it started.
To do a sano job of driving roll pins, you’ll need two punches, one to start it and one to finish it. The most overlooked is the “starter.” This is hollow so the pin can be inserted into and supported within by the punch. The pin used to finish the seating has a nib fitting into the open end of the pin to help keep the punch from slipping off under impact. For a basic build, as well as repairs and refurbishments, you’ll need No.’s 1, 2, 3, and 4. And to do an even more sano job, it’s very wise to purchase an additional finishing punch to use as a capture- or slave-punch. (More in a bit.)
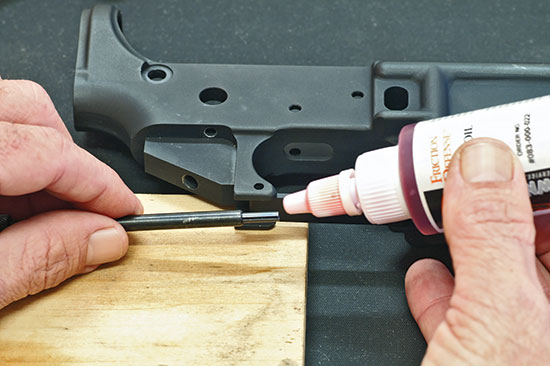
A roll pin is decidedly not a precision-made part. Look at the ends and you’re liable to see mild to overt cragginess, and also likely ends that aren’t matching up across the split. Fix this by chucking the pin in to a drill and spinning its ends against a stone or emery. I do both ends even though only one is necessarily polished and beveled for installation; removal is easier if the “other end” is also treated. Steel pins poking their way into aluminum holes is way harder on the holes than on the pins. A dab of grease or drop of oil will smooth entry and in no way reduces the “grip.” This also reduces any corrosive “sticktion” potentials (steel and aluminum will—not can—fuse without a surface barrier). This step makes them enter and exit much easier.
I use a small brass hammer to drive pins. The brass doesn’t mar as badly should a miss-hit result in hammer contact on a surrounding surface.
With a couple of exceptions, it doesn’t take much hammering force to drive a roll pin. True hits count! Pins can bend. Most roll pins are a tad shorter than the full span of the hole-to-hole gap, and a sano job finishes with the pin ends at equal depths, and each end should be a tad below flush with the part surface. A roll pin should never protrude above the surface to ensure no snagging potential.

The use of a capture- or slave-punch (another, correctly-sized punch, to line up associated holes
prior to roll pin installation) is a very wise habit to get into. The roll pin will drive the other punch out.

These are “real” roll-pin punches. One is to start and one is for the finish. These work way on better than
a standard punch set used for other shop needs. Tip: Drive the pin as far as you can using the starter punch,
without contacting the part itself with the punch end. The shorter the finish, the less chance for a mess up.

Pre-pinning-prep starts with running the roll pin ends over some oiled emery or an oiled Arkansas stone before installation.
This polishes, bevels and “trues” the pin ends so they enter the hole well. Just chuck the pin lightly in a drill and run on an
angle for a few seconds. Do both ends.
Right Set
There are different-length punches available, along with a few specially designed to drive certain pins. The shorter punches are easier to manipulate. However, longer punches are best for some installations because the impacting end extends farther beyond gun parts you don’t want to accidentally contact with a hammer, or have the larger diameter handle portion in contact with a receiver.
I usually polish the surface of smaller punches. Just chuck it up and shine it against some emery cloth. There is often some roughness that’s more annoying than damaging, but it’s a small step that helps. Ensuring there are no imperfections on the surface helps when using a punch as a slave- or capture-punch because, in that duty, the punch has to extend full through the hole set.
The use of a capture-punch or slave-punch (technically the same thing just two different uses for it) is using a punch in place of what ultimately will be the roll pin you’re getting ready to seat, and it’s being used either to hold the pieces-parts together or also to ensure alignment of the pin as the pin crosses the gap and enters the inside of the hole on the other side of the part. Gas tube pins are way on easier to install using a slave punch. That little pin very easily misaligns because the gas tube very easily misaligns. The way to use a slave punch is to let the driving roll pin push it out.
Always use the correct-sized punch! A punch too small in diameter for the pin can deform and also expand (bell) the pin end. One too large can do the same (the nib bells the pin end) and usually won’t enter the hole to set the pin below flush.
I can’t really provide precise details on running a punch you won’t soon learn on your own. Make certain the end is centered and the punch is in-line with the pin. A “follow-through” sort of striking motion is better than the woodpecker routine.
Two more things: tape and paint! I tape over every little bit of area around the installation. Plain old “blue” masking tape. It is not a sign of weakness. It’s a whopping amount of insurance against marring the area from a miss-hit. And: a dab of flat black enamel on the pin ends finishes off the job to “factory” perfection. I use a flat black paint marker.
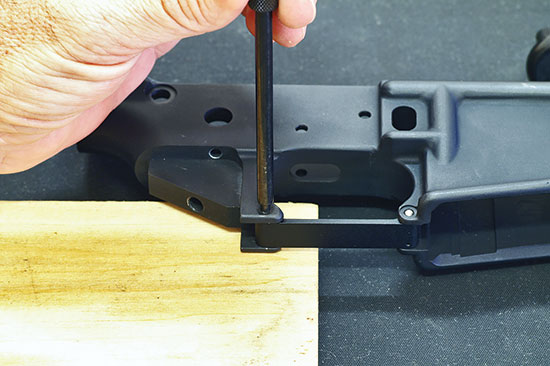
Aluminum alloy sho’ can crack! Easier than you might ever imagine. I use a piece of wood to back up the part or support the receiver, or both. This is especially important on the triggerguard and easily bent rear sight wind knob’s long thin pin.
And, yes, it’s OK to reuse a roll pin, if the ends are still tapered and the pin is still straight. This may not happen with some of the larger pins, but something like an ejector or gas tube pin can usually be reused without worries.

Proper Pin Procedure
1.
2.

3.
Start the lubricated roll pin (1) lubricated with a drop of oil using a starter punch. Drive it as far as you can with this tool (2), but shy of punch contact with the receiver surface. Switch to the nibbed-end punch and tap it on home (3). Badda-bing, badda-bang. Although Glen removed the blue masking tape for photo clarity, its liberal use eases the impact of a badda-bang. Protrusion should be equal on both sides, which means it ends up just a little below the surface. Finish with a dab of touch-up paint.
Most of the “major” mail-order outlets such as Brownells will have a roll pin punch set, as well as individual pins.
Shameless Self Promotion
The preceding is a specially-adapted excerpt from the book The Competitive AR15: Builders Guide by Glen Zediker and Zediker Publishing. For more information visit ZedikerPublishing.com or BuyZedikerBooks.com
Brownells
200 South Front St.
Montezuma, IA 50171
(641) 623-4000
www.brownells.com
Wheeler Engineering/Battenfeld Technologies
2501 Lemone Industrial Blvd
Columbia, MO 65201
(573) 445-9200
www.btibrands.com